
If you’re using the official WooCommerce iPhone app, you may have noticed that custom order statuses have their own icon when displayed in your order details:
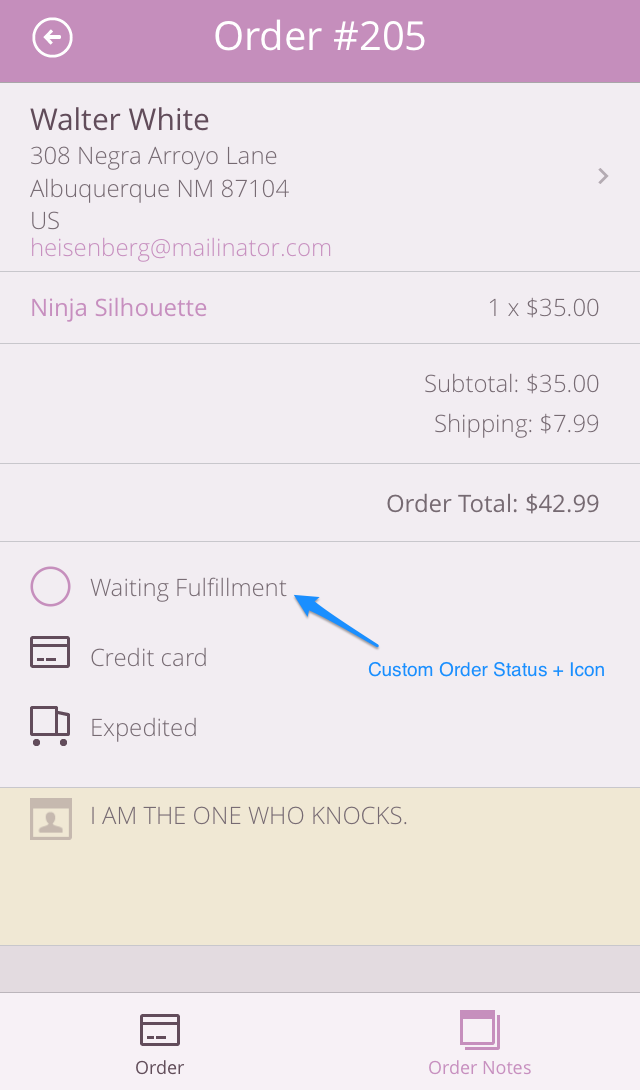
Custom Order Status Icon
These handy little icons (designed by Jay Koster) can be added to your WooCommerce “Orders” page as well so they’re consistent throughout your shop and the app.
Here’s a quick guide on how to add WooCommerce custom order status icons. You don’t have to be using the iPhone app to be able to these icons for your custom order statuses, so feel free to use them in any WooCommerce store.
WooCommerce Custom Order Statuses
First, you can easily add your own order statuses to your WooCommerce shop with a tiny bit of code. We’ve written a tutorial on creating WooCommerce custom order statuses at SellwithWP.com if you’d like to add one of your own.
That example adds “Building” and “Awaiting shipment” order statuses, so let’s use these in our test shop.
Default Custom Status Display
When you add a custom order status to WooCommerce, you may notice that the order will show up in your “Orders” list, but that no handy visual indicator of the status is shown:
![]()
This can throw a wrench in shop management, as you have to either edit the order or hover over the missing icon to see what status the order has. You could also filter your orders by status to see a list of total orders per status.
Let’s walk through how we would add a new icon that will display for all WooCommerce custom order statuses, but you could extend this to use your own icons for each new custom status.
Add a Custom Order Status Icon
Let’s go through a tutorial on how to add a custom order status icon using the same icon as the iPhone app. You could use your own icon if desired, and can even create a new one for each of your custom order statuses.
- First, upload your icon to your site’s media folder. You can save and use this icon if you’d like:

Just right-click and hit “Save Image As…”.
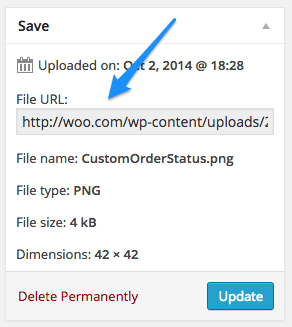
- Now get the URL of that attachment by clicking on your media file to edit it. You can copy the URL here:
- Add a custom code snippet to your site – we’ve described best practices for this here. You’ll add a snippet like this:
Note a couple of things:
- My custom order status is targeted with the
.column-order_status mark.awaiting-shipmentpart. Change this tomark.your-statususing your order status name (hyphenated if more than one word). - I’m adding the same icon for both custom statuses, but you can repeat this for each custom status if you’d like to use different icons.
- Add the URL of your media file in the
content: url();part. Notice that I didn’t needhttp://www.mysite.com/– I can just start from the/wp-content/part.
- My custom order status is targeted with the
- Check out your orders list. You’ve now got shiny new WooCommerce custom order status icons!
![]()
Adding your custom status icons is simple, and is a great way to help you see your order statuses at a glance when viewing them in your WooCommerce shop. We’d love to hear about it in the comments if you use this tip!
Please note that the iPhone app will not pull any custom icons in – the standard custom status icon will still be used.
WooCommerce pulls the built-in graphics from an icon font and uses css to apply them to the status. So another way to do this is to apply the css for another one of the graphics in that font, if there is one suitable.
For example, I have a “re-opened” custom status that is used to indicate an order that was completed but now has outstanding questions or issues. The WooCommerce font has a circle icon with a question mark inside that seemed suitable so I used that and colored it the same as the pending icon.
I apply the styles in the same way as you have above, but replace the css with this:
.widefat .column-order_status mark.processing::after {

    content: "\e018";

    color: #ffba00;

}
I like that this method avoids keeping track of an uploaded graphic. Of course, a simple SVG graphic encoded as a DataURI would have the same advantage.
I just noticed that I accidentally left that bit of css above with “mark.processing”, which redefines the look of the processing status. For my own re-opened status that I mentioned it would need to be “mark.re-opened”. And after some further work, I realized that a few more style rules are needed with a custom status to work in all conditions. Here’s the full css for my re-opened status example:
.widefat .column-order_status mark.re-opened::after {

    content: "\e018";

    color: #ffba00;

    font-family: WooCommerce;

    speak: none;

    font-weight: 400;

    font-variant: normal;

    text-transform: none;

    line-height: 1;

    -webkit-font-smoothing: antialiased;

    margin: 0;

    text-indent: 0;

    position: absolute;

    top: 0;

    left: 0;

    width: 100%;

    height: 100%;

    text-align: center;

}
Cool, thanks for sharing Doug! I’m actually going to give this a go in my testing store since I liked the idea of changing the color of the existing icons for these statuses 🙂 .
awesome!
1. If I want to apply this, this would go to the function.php file correct?
2. And all the changes that I would need to do is the icon reference and updating the mark.my-status. Anything else?
Thx
i tried it but doesnt work.
it doesnt not show the image.
tried on both ways:
content: url(/wp-content/uploads/2014/10/myimage.png);
content: url(full url of my image);
Hey there, are the classes that you’re targeting matched up to your order status slugs? This part:
.column-order_status mark.awaiting-shipmentwill need to use the correct slug for your order, and the URL will definitely be different, as mine includes the upload date.Fantastic! … Thanks Beka … and Doug 🙂
super! thanks Beka!