
In part 1 of “Adding plugin settings to WooCommerce”, we showed you how to add plugin settings to an existing settings section (e.g., “Products > General”) or to an existing settings tab in a new section, such as a new section under “Products”.
However, if your plugin has a lot of settings, (something like Memberships is a good example), then you may need a dedicated settings tab for your plugin.
Adding a plugin settings tab gives you the ability to organize your settings as needed, and to have subsections for your plugin settings.
When to add a new tab
Before deciding to add your own settings tab, you should ask yourself first if your plugin needs all of its settings. Can you remove any settings to make the best decision for your user, then let them filter these settings as needed? It’s far easier to add a new setting than remove an existing one.
If all settings are needed, you could also try to fit your settings under an existing tab or section in the WooCommerce settings, which is a great way to avoid clutter in the settings page and keep your plugin’s settings contextual.
If neither an existing section or a new section under an existing tab will work, then a unique settings tab is a good candidate for your plugin.
This will let you organize your settings your way, and break them up into sections as desired.
Adding your new settings tab
WooCommerce gives us an abstract WC_Settings_Page class with all of the basics we need to add settings. This sets up the saving and validation of settings fields, along with creating some field types, so you can easily extend this class to add your own settings page.
We’ll start out with the settings class in our plugin by checking if the class exists, then extending WC_Settings_Page to create our new settings class. This will handle the saving an output of settings for us, so our class will focus on the settings themselves.
<?php
/**
 * My Plugin for WooCommerce
 *
 * @package   My-Plugin/Admin
 * @author    Me
 * @category  Admin
 * @copyright Copyright (c) 2016, Me
 * @license   http://www.gnu.org/licenses/gpl-3.0.html GNU General Public License v3.0
 */

if ( ! defined( 'ABSPATH' ) ) exit; // Exit if accessed directly

if ( ! class_exists( 'WC_Settings_MyPlugin' ) ) :

/**
 * Settings class
 *
 * @since 1.0.0
 */
class WC_Settings_MyPlugin extends WC_Settings_Page {

    // the magic will go here

}

endif;

return new WC_Settings_MyPlugin();
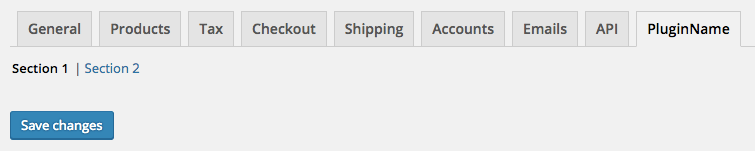
Whoohoo, a tab is here! It doesn’t have a title or anything at all yet, but we’ve got settings.
I’ll include a full class file at the end of this tutorial, but I will wrap it in a function to load it at the filter woocommerce_get_settings_pages so you can see it in action if you install it as a plugin.
Construct the Settings tab
Now we have to build our settings tab within this class. First, let’s add the tab ID and label, along with some functions to handle saving and outputting sections. If you want an example, have a look at the General Settings Tab in WooCommerce.
/**
 * Setup settings class
 *
 * @since  1.0
 */
public function __construct() {

    $this->id    = 'myplugin';
    $this->label = __( 'PluginName', 'my-textdomain' );

    add_filter( 'woocommerce_settings_tabs_array',        array( $this, 'add_settings_page' ), 20 );
    add_action( 'woocommerce_settings_' . $this->id,      array( $this, 'output' ) );
    add_action( 'woocommerce_settings_save_' . $this->id, array( $this, 'save' ) );

    // only add this if you need to add sections for your settings tab
    add_action( 'woocommerce_sections_' . $this->id,      array( $this, 'output_sections' ) );
}
If your plugin will have sections within its tab, you’ll want to add these sections as an array as well:
public function get_sections() {

    $sections = array(
        ''         => __( 'Section 1', 'my-textdomain' ),
        'second' => __( 'Section 2', 'my-textdomain' )
    );

    return apply_filters( 'woocommerce_get_sections_' . $this->id, $sections );
}
Now we’re getting somewhere! We’ve got a name for our tab, along with some sections.
Add your settings
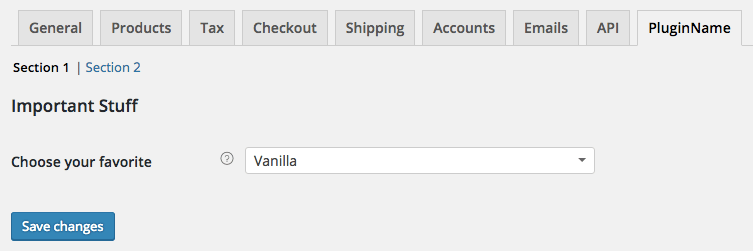
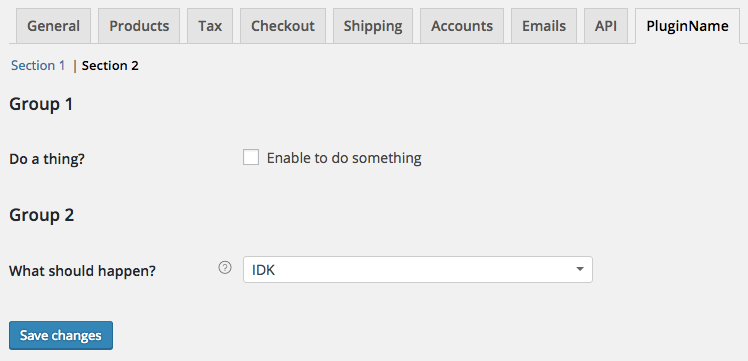
Now we’ll continue by generating our settings. If you’ll have sections for your settings tab, you can generate all settings within one function, and check what section is being viewed to determine which settings should be displayed.
This is a big function, but it’s not too tough to follow — each setting is an array. We add these arrays based on which section is being viewed using the IDs we’ve set up above.
This is going to give me one setting on the first section, and 2 settings on the second section. However, I’ll need to output them so they show up under my sections, which is what we’re moving to next.
Wrap up: Output and save
To output these settings under the right section, we’ll need a function to output them. The WooCommerce settings API will give us a lift here: WC_Admin_Settings::output_fields( $settings ); will do this for you, you just pass it the settings to show. Our previous function will generate the right settings, and we’ll pass them to WooCommerce to output.
/**
 * Output the settings
 *
 * @since 1.0
 */
public function output() {

    global $current_section;

    $settings = $this->get_settings( $current_section );
    WC_Admin_Settings::output_fields( $settings );
}
This is what properly outputs our settings arrays based on the section being viewed, and now we’re cooking with gas:
Finally, we’ll need to save our settings based on which section is being saved so that we can properly retrieve them for use elsewhere in our plugin. WooCommerce has a helper for this as well: WC_Admin_Settings::save_fields( $settings );
This will save settings correctly as options using the IDs you’ve set.
/**
 * Save settings
 *
 * @since 1.0
 */
public function save() {

    global $current_section;

    $settings = $this->get_settings( $current_section );
    WC_Admin_Settings::save_fields( $settings );
}
This is the last bit our class needs, and once we have this, we have an operational settings tab.
Final Notes
Adding your own settings tab is made much easier by the helpers WooCommerce gives you in the form of the abstract settings page, helper functions to output and save settings, along with several useful examples in WooCommerce itself.
If you want to take a look at the full code, here’s a version you can install as a plugin to activate it and see how the code generates the tab and settings.
thanks for this wounderful tutoroial, can you please tell me , who can i trigger this on checkbox enable disable