First off, this post owes a debt of gratitude to Ashley Schroder and Colin Mollenhour, without whom it would not exist.
The goal of this article is to describe a development environment configuration that’s ideally suited for developing and deploying version controlled plugin/extension code, that is plugged in to a much larger system codebase. This is precisely the situation when developing extensions/override code for Magento, or plugins for WordPress and WooCommerce, and is a fairly tricky setup the first time you encounter it, especially if you come from a background like me where all the source code required for a system is checked into the same place.
I will not cover the installation or configuration of Magento or WordPress here, as that’s already covered well in multiple places, and besides, this setup could probably apply to any number of other large pluggable frameworks that I have no experience in. This article will assume a few different pieces of software are used, but really the only required one is modman.
Assumptions:
- Eclipse for the IDE
- Linux/Mac development and production environments
- Apache or other server for serving a local webroot
- Git/GitHub for version control, though SVN could work as well
- EGit for Eclipse Git support
- Aptana PHP for Eclipse PHP support (I know there are others out there but this one has always worked best for me)
- Modman
The First Rule of Magento/WordPress Development
Figuring out a reasonable way to structure Magento/WordPress projects is not easy. When I first began I knew I did not want to commit to source control Magento’s roughly 15k of core files, nor even WordPress’s roughly 1k. I also abide by the First Rule of Magento/WordPress Development: You do not talk about Fight Club. I mean, you do not modify core files.
My first Magneto projects were therefore predictably not the most elegantly structured: I would code an extension in one revisioned Eclipse project, and copy the files over to my local Magento webroot in a different Eclipse project. This setup while functional presented three major drawbacks:
- If I’m working in the webroot project I have to remember which files I’ve changed and copy them back to my revisioned extension project in order to check them in or compare to previous revisions. I tend to forget and end up with broken code on production.
- If I’m working in the revisioned extension project I can’t just make a change and immediately refresh my browser to see the result, I have to make the same change to the extension code in the webroot, which slows me down.
- Deploying code to production is painful because the file/directory structure I use when developing isn’t necessarily the same as what it needs to be when plugged in to Magento or WordPress.
But I was stuck with it, that is until I found Ashley’s post, which did such an incredible job describing a modman-based development/deployment setup that it made perfect sense to me and I immediately adopted it and began working with it.
Now the key player in all this: modman, is a brilliant little shell script which creates symlinks from a version controlled source (your module code) to a destination (your Magento/WordPress framework webroot) mapped by a simple configuration file. Meaning that your module code is: version controlled, removed from the core framework files (for ease of upgrading), and can have a structure independent of the final deployed layout. Modman achieves this by actually cloning (Git) or checking out (SVN) your module code into a special .modman directory within the framework project, and symlinking from there according to your modman configuration file. This setup described by Ashley completely solved problem #3 for me, however because I prefer to use Eclipse for development (which can not handle source controlled code within a project, unless the entire project is under source control), problems #1 and #2 still remained.
When I’m developing I like to try to remove as many obstructions as possible. I want to be able to modify a file and immediately refresh my browser and see the result. I want my IDE source tree to identify that file as being modified so I don’t forget to commit it. I just want to focus on the code. To realize this while developing within Magento/WordPress it was clear to me that my ideal setup would involve:
- An Eclipse project containing unrevisioned Magento or WordPress framework code that I can blow away or upgrade at will, and that serves as my local webroot
- Additional Eclipse projects containing source-controlled module code in the form of Magento/WordPress plugins or themes
- A modman script modified to symlink the module code in to the core framework code, regardless of the location of the module code
Step 1: Create the Eclipse Projects
From within Eclipse (or other IDE), create a project for your framework (Magento/WordPress/Whatever), and create a project for your custom code. For the sake of argument I’ll pretend from here on that we’re developing an extension called ‘Widget’ for Magento, but keep in mind this can be substituted with whatever framework/module you’re actually working on. Our project names will be ‘magento’ and ‘widget’ then. Install Magento into the ‘magento’ project, point your local apache and verify that’s all working correctly.
Step 2: Attach Git to the Module Project
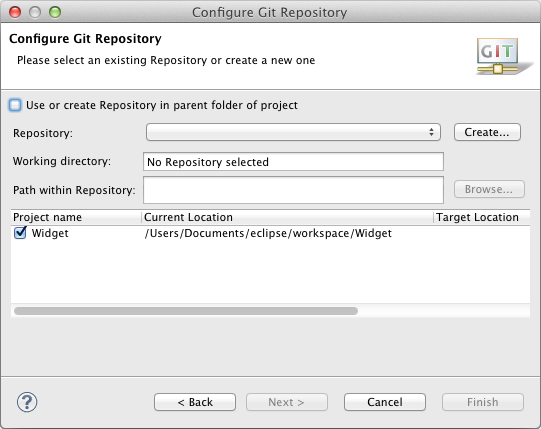
Next we will attach a local Git repository to the Widget project. Right-click the Widget project in the Eclipse project navigator, and select Team > Share Project… > Git. Note that if you’re mirroring my setup exactly you’ll also see an option for ‘Aptana Git’; ignore it, while I love Apatana’s PHP editor, their Git support is horrible and I wish they didn’t bundle it in.
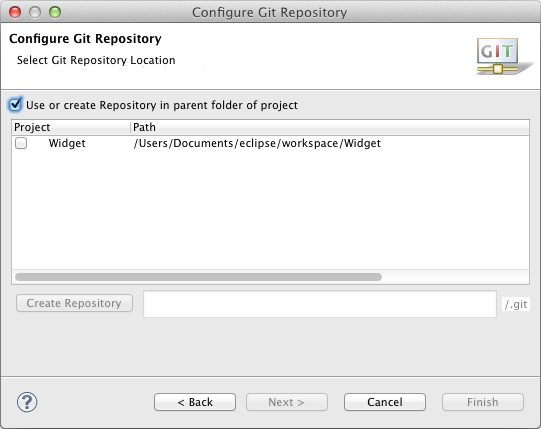
In the Configure Git Repository dialog that appears, select ‘Use or create Repository in parent folder of project’.

This should change the content of the dialog so that you now see your Widget project listed as so:

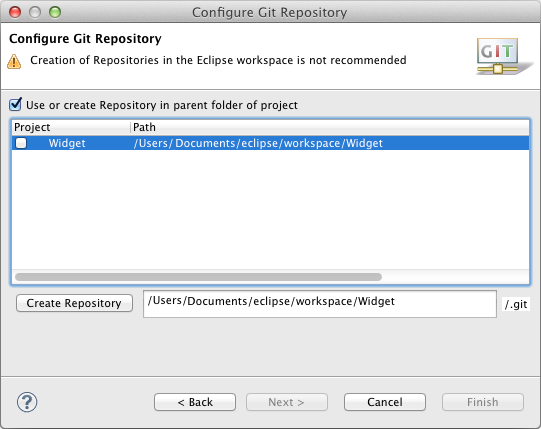
Click the checkbox next to the project name. Note that the checkbox might not actually appear checked, however you should see a warning message about how what you’re doing is not recommended (ignore it), and the field to the right of the ‘Create Repository’ button should be filled in with the path to your project. Click the ‘Create Repository’ button and then click ‘Finish’.

Your project should now have a name indicating it’s shared, something like ‘Widget [Widget NO-HEAD]’.
At this point if you’re not planning on connecting this local Git repository to a remote one like GitHub then you can move on to step 3. Otherwise, there are one of two likely scenarios you’ll be facing: attaching to a brand new empty GitHub repository, or connecting to an existing GitHub repository that has commits. Both options are discussed below.
Step 2a: Connect to Empty Remote Repository
To connect your local Git repository to a new empty remote one, move to the command line and do the following from within the extension project:
git remote add origin git@github.com:youraccount/Widget.git
Next you just need to commit and push a change. I’ll tend to do this from the command line with a gitignore for the Eclipse settings files:
echo ".settings" > .gitignore && echo ".project" >> .gitignore

git add .gitignore

git commit -m "Initial commit"

git push -u origin master
Step 2b: Connect to an Existing Remote Repository
Otherwise, to connect your local Git repository to an existing remote one that already contains commits, move to the command line and do the following from within the extension project:
git remote add origin git@github.com:youraccount/Widget.git

git pull

git checkout master
Note that you may get somewhat of an error message on the git pull step, but its fine.
Step 3: Modman
Download and install modman if you haven’t already. I won’t spend a huge amount of time explaining how to configure modman as its covered well in Colin’s docs, but suffice it to say that you will create a file named ‘modman’ in the Widget project that defines the symlink mappings for modman to manage. The basic syntax is simply ‘source’ ‘destination’, therefore we may have something like:
# extension code

Widget app/code/community/Acme/Widget

# Magento Global Configuration

Acme_Widget.xml app/etc/modules/Acme_Widget.xml
Check that file into source control, and move to the command line for the next step. From within the Magento project, execute the following:
modman init

modman link widget ~/workspace/Widget
Where ‘widget’ is just used to identify the module being managed, and can be whatever you like, though it should be something meaningful. My convention has been to use the site url for site-specific override/extension/theme code ie ‘acme.com’, and use the extension/theme name for generic extensions/themes that I may want to use in multiple projects, ie ‘widget’. You can use modman to map any number of extensions/overrides into your framework project.
The path specified is the path to the local extension project. The modman file must exist at ~/workspace/Widget/modman in the current example, and remember that we’re running this modman link command from within the Magento project.
Now at this point if you’ve been following along we have: a revisioned extension project named Widget symlinked into an unrevisioned Magento project serving as webroot. Note that if you are following along in Magento then at this point you’ll need to log into the Admin and go to System > Configuration > Advanced – Developer > Template Settings and set Allow Symlinks to Yes. Otherwise Magento won’t follow the symlinks and you’ll get a bunch of errors when you load a page.
Step 4: Pushing Code
So what did all this work buy us? Well, by now if everything’s working correctly you’ll be able to modify files from either the Widget extension project, or the Magento project, and both ends will be the same since the extension files within Magento are simply symlinks back to the extension project. Eclipse will visually indicate in the source tree when a revisioned extension file is modified or added, and you can commit, update, and push changes to the local and remote Git repositories right from within Eclipse. Most importantly you’ll have your code neatly organized, and you’ll be able to focus on writing that new extension that saves the world, rather than trying to remember to copy changes back and forth between multiple projects, and forgetting whether you’ve actually committed those changes yet.
Sometimes admittedly, at least for me in OSX, if you modify a file through the symlink in the Magento project, the Eclipse UI may not report the change in the extension project source tree. This doesn’t always happen, but if it does the solution is to:
- Refresh (F5) the extension project folder in the source tree
- If that doesn’t work, right-click the extension project folder in the source tree and click Team > Advanced > No Assumed Unchanged
Once you’ve modified a revisioned file, you can right-click it within Eclipse and do Team > Commit…

If you’re also working with an attached remote repository, ie GitHub, once you’re ready to push your local commits, you simply right-click the extension project folder and do Team > Push to Upstream.

Step 5: Deploying to Production
The final step in all this isn’t related to the development environment at all, however it’s the ultimate reason we do all this work: deploying code to staging/production. Here’s where modman as originally intended really shines for me. On the command line on staging/production, run the following from your Magento/WordPress root:
modman init

modman clone widget git@github.com:youraccount/Widget.git
Modman will clone your extension code from the remote repository and symlink it according to your modman configuration file, just as you would expect. After you develop your extension further and push additional changes to the remote respository, simply return to your server and run the following:
modman update widget
If you need to delete the extension and clean up symlinks, use the following:
rm -rf .modman/widget

modman clean
Conclusion
Well, I know there are some concepts here that I found tricky when I first encountered them: how modman functions by creating the mapped symlinks, the multiple repositories involved, the best way of actually structuring this combination of a massive number of core framework files interlaced with revisioned extension/theme/override files. I hope that it’s all made sense and gives you a better way of structuring your Magento/WordPress projects for engineering rather than hacking. If any steps don’t make sense, or anything is unclear, or you have some ideas on how to improve the setup, please leave a comment below.
Excellent guide! It’s save my day
Thanks.It is a great article.
The link https://github.com/foxrunsoftware/modman is not valid.
Would you please check it.
Hey Frank, you’re right, actually I deleted my fork of modman as the parent project actually added the very feature that I had added myself, so there was no more need for my fork. I’ve gone through and updated the article just now to remove the confusion, I’d recommend just using Colin’s modman as is: https://github.com/colinmollenhour/modman
I am storing Magento in AWS Elastic Beanstalk. In order to deploy to multi server setup we use .git to push code. Our issue is, that in order to do this, we also have some custom magento files, and the whole magento installation is in .git as well. That means that we have .git inside .git, how do you solve this ?
Right now .modman doe not work in production for this exact reason. Essentially under ./.modman/extension/* nothing exists, because .git gracefully ignores everything under 2nd .git folder inside .git repository.
probably best to log this on the modman repository 🙂