

A frequent question I get from developers using our Measurement Price Calculator plugin is along these lines:
Can I set minimum and maximum input values for measurements?
At present, this isn’t possible because (1) a UI for measurement attributes would be a bit tough to do on the current product page without being confusing, and (2) the inputs for measurements are currently text fields, not number inputs. The reason for this was to maintain the widest browser compatibility possible along with supporting the comma-separated dropdown type (though this is something we’re looking to change as the number input is much more widely supported).
As a result, to add these attributes, you need to change the input type, then add the attributes for min and max values. This can be fairly straight forward, or quite involved depending on if these values are consistent across products or not.
Overview
If you need to set a static minimum and maximum value for inputs across all of your products, this is pretty simple to do, and we have a snippet available in our snippets repo that shows you how to do this.
However, what if you need to set different input attributes on a per-product basis? We need a way to save that data on the product, and then get it to change these inputs on the frontend. This is a great use-case for a post custom field, which is saved as post meta.
In this tutorial, we’ll
- use the custom field to store input limits / attributes like maximums
- get these fields on the frontend for enabled measuremenets
- use some javascript to change the field(s) to number inputs and add our custom field values
While we could use a custom field on the product for each value, like mpc_width_min, mpc_width_max, mpc_width_step, etc, this is probably a pain to set up. I’m going to use one custom field for each input type, like mpc_width, and then the value will be a list of attributes: min=0, max=100, step=1
We’ll need to play with this data a bit to have it in this form, but it’s probably more user-friendly to set up your products this way.
Set up Custom Fields
We’ll use this format for every custom field:
Name => mpc_{measurementName}
Value => min=$min, max = $max, step = $step
You can set the minimum, maximum, and step to whatever values you’d like. The possible field names would be: mpc_width, mpc_length, mpc_height, mpc_area, mpc_volume, and mpc_weight.
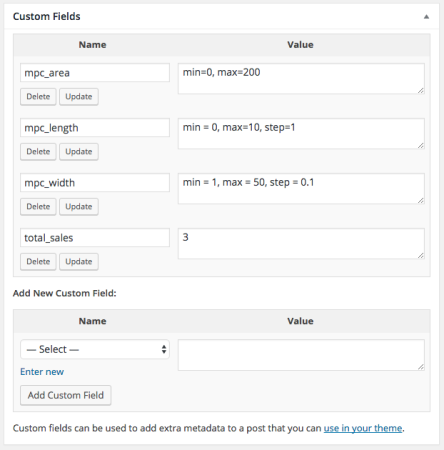
Only the inputs on the product page will be used, but you can enter any of them you’d like for the product. By the time we’re done, our code will only use the values for enabled measurement types. If you want to skip to the full code, feel free 🙂
Turn a post custom field into an array
The first thing that we’ll run into is, if we use a list in our custom field value, it will be saved exactly as it’s entered — we can’t save an array or any type of data other than a string.
For example, if I have a field called attributes, and the value is:
min = 1, max = 10, step = 1
when I get the custom field, it will spit that string out exactly. We’ll need to take this string and twist it into data we can use — I want an associative array of the attribute => value.
We’ll assume we have the product object and the post meta key for the field we’re going to get for now. This way, our function can focus on just getting the field, and turning it into an associative array in the form of:
'key' = array (
    'attr1' => 'value1',
    'attr2' => 'value2',
);
and so on.
- Step 1: get the post meta and see if it’s empty
- Step 2: turn this into an array using a comma as a delimiter. Instead of
key => min = 1, max=10, step =1
we’ll have something like this:
key = array( 0 => 'min = 1', 1 => 'max=10', 2 => 'step =1', ); - Step 3: now loop through those array values, and break them apart using the ‘=’ sign — part 1 should become the array key, and part 2 should become the value.
After a bit of sanitization / sanity checks, we’ll put this into a brand new array for the custom field in the format we want.
function sv_mpc_generate_calculator_input_limits( $product, $meta_key ) {

    // get the meta field, bail if it's not set
    $meta_values = get_post_meta( $product->id, $meta_key, true );
    if ( empty( $meta_values ) ) {
        return array();
    }

    // turn this into a messy array ( [0] => 'key = value') for now
    $meta_values = array_map( 'trim', explode( ',', $meta_values ) );
    $new_values = array();

    // break each string into an associative array like 'key' => 'value'
    foreach ( $meta_values as $value ) {

        $piece = explode ( '=', $value );
        $piece[0] = sanitize_text_field( $piece[0] );
        $piece[1] = floatval( trim( $piece[1] ) );

        $new_values[ $piece[0] ] = $piece[1];
    }

    // return the new associative array for this field
    return $new_values;
}
This gives us our first major piece of the puzzle: how to save the input attributes on a per-product basis in a data format we can use.
Generate the needed javascript
Next, we’ll need to use this data for the product to generate some javascript. This javascript will add the attributes in our custom field to the input. We’ll need to:
- Use our helper function above to generate our usable data (we’ll do this for every measurement type so we have data for each input)
- Check if this variable contains data or not; if so, we’ll start generating our jQuery snippets
- For each measurement that’s enabled, generate a rule that find that measurement’s input, then adds the right attributes to it.
We already assumed we have the product object, so we can keep on assuming that. I’m also going to assume I already have the measurement inputs enabled for the product; if I already have the product, I know I can get them to pass into this helper function.
function sv_mpc_generate_attributes_js( $product, $measurements ) {

    $rules = array();

    foreach( $measurements as $measurement ) {

        // get the custom field for this measurement in array form
        $vals = sv_mpc_generate_calculator_input_limits( $product, 'mpc_' . $measurement->get_name() );

        // break for this measurement if it doesn't have a custom field
        if ( empty( $vals ) ) {
            continue;
        }

        // we have a value, so build a jQuery rule to change the input atts
        $rules[] = "$('#" . $measurement->get_name() . "_needed').attr({ type: 'number', min: '" . esc_attr( $vals['min'] ) . "', max: '" . esc_attr( $vals['max'] ) . "', step: '" . esc_attr( $vals['step'] ) . "' }).addClass('input-text');";
    }

    // give back a string of each rule, one per line
    return implode( "\n", $rules );
}
Now we’ve used our previous function to get our custom field data, and this function uses that to generate a string of javascript. The last step will be to get the product and enabled measurements, pass them into this function, and when it returns our javascript, output it on the page.
Put it together: Add script to product page
First thing first: we’ll need the product object. We can confirm we’re on a product page, and grab that global.
Next, we need the enabled measurements. We’ll confirm the calculator is enabled for the product, then grab the enabled measurements.
We’ll pass the products and measurements in our function to generate javascript, and when that gives us back our string of javascript, we’ll enqueue it on the product page.
function sv_wc_measurement_price_calculator_input_min_max() {

    // bail unless we're on a product page and MPC is active
    if ( ! ( is_product() && class_exists( 'WC_Price_Calculator_Product' ) ) ) {
        return;
    }

    global $product;

    // bail unless the calculator is enabled for this product, this is also why we hook
    // into the footer scripts, since this isn't available immediately at page load
    if ( ! WC_Price_Calculator_Product::calculator_enabled( $product ) ) {
        return;
    }

    // get the possible measurements for the current calculator set up
    $settings = new WC_Price_Calculator_Settings( $product );
    $measurements = $settings->get_calculator_measurements();

    // get any rules we should add based on which measurements are enabled, +
    // which custom fields exist
    $rules = sv_mpc_generate_attributes_js( $product, $measurements );

    wc_enqueue_js( $rules );

}
add_action( 'wp_print_footer_scripts', 'sv_wc_measurement_price_calculator_input_min_max' );
Final Product
If any product has MPC custom fields set, our custom code here will
- grab the values for that field,
- turn them into usable data,
- generate some jQuery for the fields if that calculator input is enabled, and
- output that javascript on the page to change the input.
When we’re all said and done, we’ll now have number inputs that use the data in our custom fields to set minimum values, maximum values, and required steps.
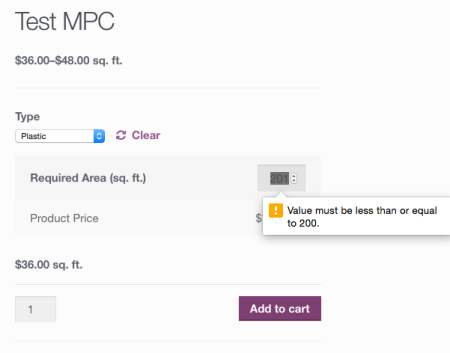
This could definitely be easier. We’re looking into changing these input types in the future and just letting you filter an array of attributes, which would make this sort of customization much simpler. We want to be sure that we maintain usability for the majority sites and their customers before doing so, along with support for the comma-separated / dropdown input types. Keep an eye on the changelog 🙂
Want to check out the full code? Here’s the entire gist.