The checkout flow on your WooCommerce site (or the sites you build and manage for your clients) is one of the make-or-break parts of the entire online shopping experience. After all, checkout is where the final conversion happens.
It’s where your online store converts visitors to paying customers. So, without an optimized checkout flow, you’re at a real risk of losing visitors instead of gaining new customers.
According to the Baymard Institute, the average cart abandonment rate is 69.8 percent—and it’s been in that “seven out of 10 carts are abandoned” range for years.
The top reasons for WooCommerce cart abandonment include hidden costs, payment or shipping issues, and mandatory account registration.
While you can’t completely eliminate cart abandonment, there are definitely ways to reduce it—optimizing your checkout process on your online store can increase your conversion rate by 35.6 percent, according to Baymard.
In this article, we’ll cover eight strategies and extensions that will help you do just that: optimize your checkout flow in WooCommerce to reduce abandonment and increase conversions.
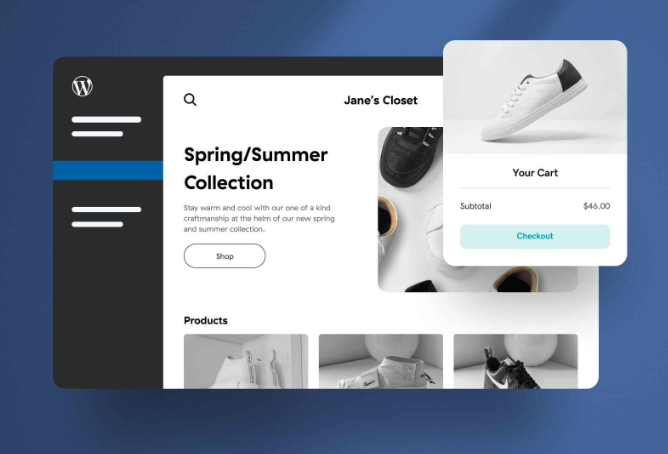
WooCommerce checkout page overview
The standard WooCommerce checkout page is enough to get you started with an ecommerce store. Once you set up WooCommerce and your checkout, you’ll be able to get critical order details such as product, price and buyer details such as billing name, address, shipping addresses, etc. Plus, you’ll be able to take payment via PayPal or direct bank transfer.
*Please keep in mind that Woo actively develops its checkout page, so the interface can change periodically.
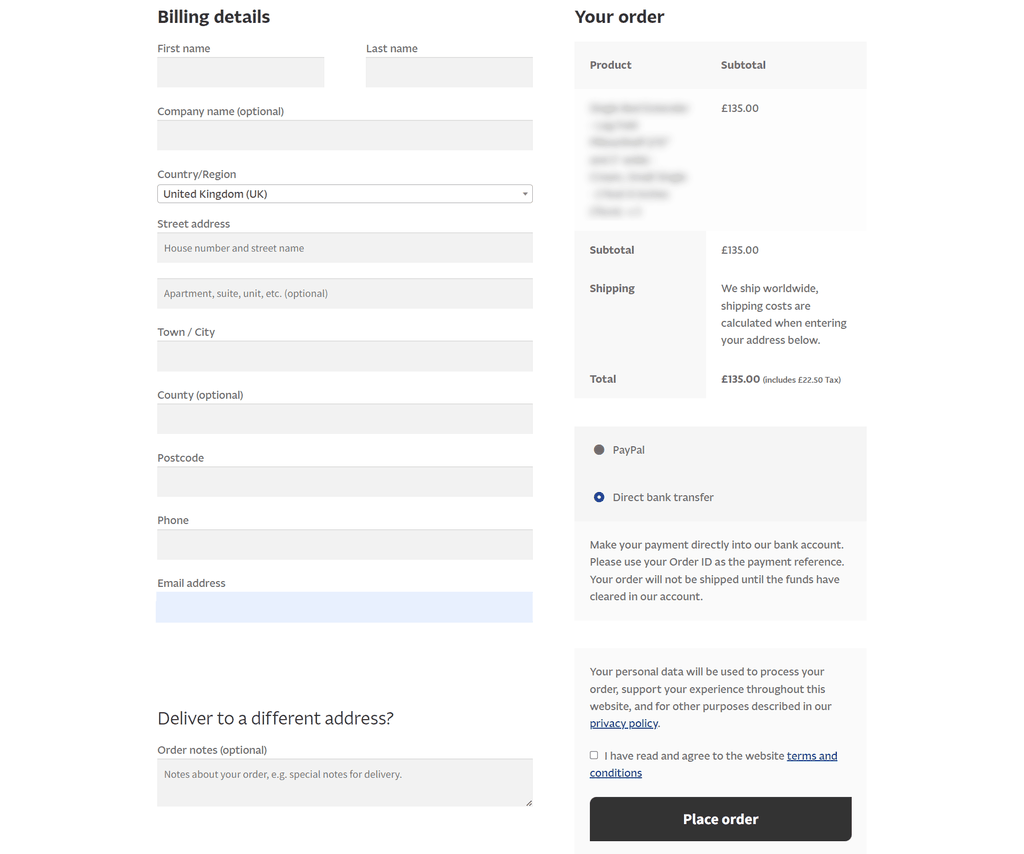
As standard, the WooCommerce checkout includes the following:
Information about your buyer
You will be able to make full contact with your buyer once they’ve ordered. The WooCommerce checkout includes:
- First name
- Last name
- Company (optional)
- Full billing address
- Phone number
- Email address
- Full Shipping address
- Order notes (optional)
Information about their purchase
You will know exactly what they’ve ordered. The standard checkout includes:
- Item purchased
- Price
- Full shipping address
Payment options
There are a lot of good reasons to consider WooCommerce checkout improvements. Many websites want to offer more payment options to increase conversion.
You may also need more information in order to easily process a payment. For example, you might sell personalized items and need further information. Or maybe you want to offer gift options.
There are a lot of reasons to improve the WooCom checkout, and the great news is, with WordPress’ modular design and thousands of plugins and extensions, it’s very easy to have your checkout flow customized exactly to your needs.
Let’s look at some popular strategies for improving WooCommerce checkout flow.
1. Eliminate unnecessary fields
Baymard’s checkout research found an ideal checkout flow usually has as few as 12 to 14 form elements—yet the average ecommerce store in the U.S. has almost double that at 23.48.
Don’t ask for more information than what is absolutely necessary.
Do you really need a customer’s phone number (your payment processor might require it, but if they don’t, do you need it)? And can you avoid making someone type in an identical address for billing and shipping? Go field-by-field through your checkout forms—and evaluate the necessity and value of each one.
This can be modified within the WooCommerce config by going to WooCommerce > Settings > Shipping > Shipping Options > Shipping Destination. From here, you can simply delete the uncessary fields.
But for many, installing a plugin might be easier. Once you’re ready to start trimming, you can use a WooCommerce plugin like Checkout Field Editor ($49/year at WooCommerce.com) to customize which fields are included on your checkout page. You can easily edit existing checkout fields for both billing and shipping.
And even though this article is about streamlining your checkout flow, if you need to add extra fields, you can use Checkout Field Editor for that as well.
One quick note: After making these changes (or any significant changes to your site), it’s always wise to test your checkout flow on a staging site to make sure everything still works as intended.
2. Streamline your checkout process
A long and complicated checkout process is one of the top reasons for cart abandonment.
Streamline the process by reducing the number of steps your customers have to go through to finish a purchase—or, at the very least, by showing them a progress bar during checkout.
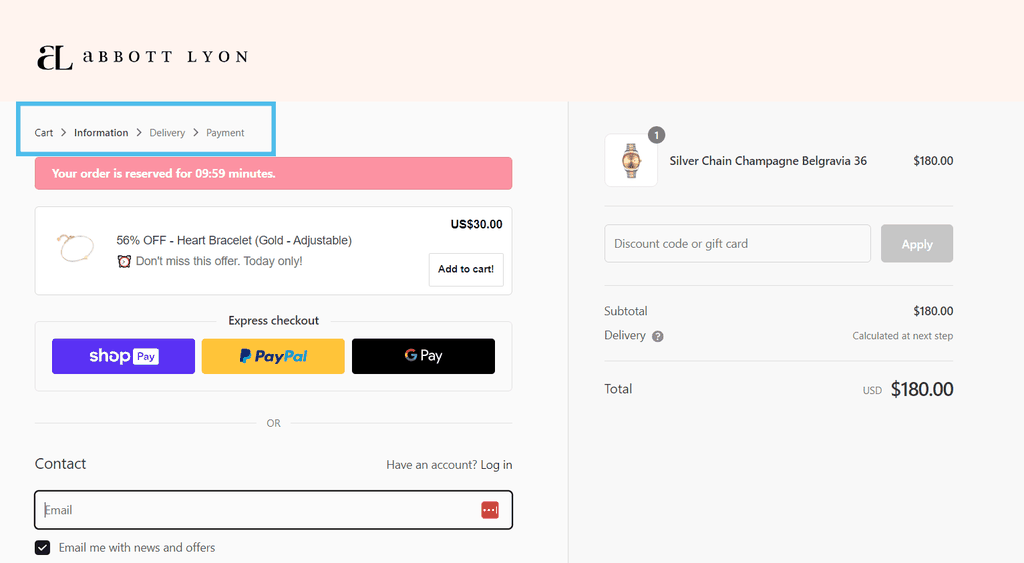
Here’s an example from Abbot Lyon that marks each step in their checkout flow (Information > Cart > Information > Delivery > Payment). The step the user is on is bold.
Another way to streamline your checkout process is to blend the “add to cart” and “check out” processes into one.
You can use the WooCommerce One Page Checkout plugin ($79/year at WooCommerce.com) to allow visitors to complete the checkout process immediately after adding the item to their cart without visiting a separate checkout page.
You can add One Page Checkout to any product page (or other page) on your site with a simple shortcode.
3. Offer multiple payment options
Approximately one out of 12 people who abandon a cart do so because their preferred payment option isn’t available. Another study found that 40 percent of online shoppers were more comfortable buying from a store that offered multiple payment methods.
In other words, the more payment options you offer, the better your chances of converting visitors into customers.
There are a number of payment gateway extensions in the WooCommerce store; too many to list here. Some of the most popular and versatile are Authorize.net ($79/year at WooCommerce.com), PayPal Payments (free at WooCommerce.com), Global Payments HPP ($79/year at WooCommerce.com), and AliPay ($79/year at WooCommerce.com).
Since the cost of adding lots of payment gateways can add up (and having too many might make your checkout look too cluttered), you should choose the ones that will matter the most to your target customers.
What countries are your customers coming from, and what payment methods are big there? Do you have a lot of customers buying on mobile? Options like Venmo, Apple Pay, and Google Pay can be useful. Have you had multiple customers ask for a specific payment method?
Also consider that wallet options like Apple Pay, Google Pay and others can also streamline the checkout process by adding an one-click payment button directly on the cart or even product pages.
This reduces the number of page loads, from product discovery to payment, while also allowing customers to pay with a method that they already have set up, letting them avoid typing in a card number again.
Odds are there are plenty more who also would’ve liked to see one of these methods but didn’t take the time to reach out.
4. Use visual cues after an item has been added to the cart
Once a customer adds an item to their cart, what happens next? Sure, most people know to click on the shopping cart icon at this point—but why make them hunt for it? If the next action step is not clear, your visitors could end up confused or get distracted and might abandon their cart altogether.
There are two ways to approach this problem. The first option is to give customers a visual cue that confirms the item has been added to the cart, along with the option to view the cart and proceed to checkout or continue shopping.
Another option is to automatically redirect them to the checkout page — and WooCommerce has a built-in feature that allows you to do just that.
Go to WooCommerce > Settings > Products. Check the box next to Add to Cart behavior.
Then, click on the Advanced tab and select the Checkout page from the drop-down menu for the Cart page. With these changes implemented, your buyers will be redirected to the checkout page after adding the item to their cart.
You might also want to change the Add to Cart button by modifying your functions.php (here are instructions on how to do that) file or using a plugin like WC Custom Add to Cart Labels (free at WordPress.org).
5. Skip or simplify the account creation process
One of the top reasons for cart abandonment is forced account creation. According to one study, a major ecommerce site saw a $300 million revenue increase when they stopped requiring customers to create accounts or log in to checkout.
The quickest remedy is to offer guest checkout. Then, once the purchase is complete, you can give customers the option to create an account.
Another great option is the WooCommerce Social Login extension ($99/year at WooCommerce.com), which allows your customers to log into your WooCommerce store with their Facebook, Twitter, Google, Amazon, LinkedIn, PayPal, Disqus, Yahoo, or VK account.
More than three-quarters of customers say they prefer social login on an eCommerce site over manually creating an account.
Social Login works efficiently behind the scenes as well to link a customer’s social account to their account on your site.
The plugin will first try to identify a customer based on the social identifier and see if they’ve used a social media profile on the store before. If they did, the plugin will log them in automatically.
If not, it will search for the user based on the email address used for the social profile and check if they have an account. It will then link the social profile to the store account and log them in. Lastly, a new user account will be created if there are no matching users.
6. Eliminate the surprises
Surprise costs—be it shipping, fees, taxes, or a coupon code that doesn’t work—account for 47% of abandoned carts. So, the more you can eliminate those surprises before a customer arrives at checkout, the better.
Some ways you can reduce the surprises are:
- Be upfront about fees. Include details on your product page to let customers know what fees they’ll encounter at checkout.
- Add a shipping calculator. Avoid surprises in shipping costs by allowing customers to calculate shipping (or estimated shipping) before entering the checkout process. You can configure this on the WooCommerce backend: WooCommerce > Settings > Shipping > Shipping Options > Calculations. You can also use an extension to integrate a shipping calculator into your pages by installing something like Woocommerce Shipping Calculator On Product Page ($27 at CodeCanyon).
- Let customers try coupon codes without having to enter their address first. If the first page of your checkout flow is for a shipping address and a customer can’t enter their coupon code until the billing section on the next page, you could lose people who want to make sure their coupon works before they take the time to enter all of their information. (URL Coupons from SkyVerge handles this nicely)
- Optimize your product pages. Make sure that your product page includes all the important information about what you’re selling above the fold. Important details should be visible without users having to scroll down.
7. Upsell useful services
“Upselling” sounds like something that only benefits a store, not a customer—but that’s not necessarily the case. In fact, upselling works best when it’s a genuine service to customers.
You can upsell services during checkout (like gift wrapping, rush handling, or insurance) that meet a need for customers—and might even help close the sale. WooCommerce Checkout Add-ons ($79/year at WooCommerce.com) is a quick and highly customizable way to add free or paid options during checkout.
(Bonus tip: To keep your checkout process as streamlined as possible, you can conditionally display add-ons; for instance, only displaying gift options if the shipping and billing addresses are different. The code to do that is here.)
8. Pay attention to your analytics
Lastly, pay close attention to your checkout flow analytics. You can unlock deep eCommerce insights by using WooCommerce Google Analytics Pro ($79/year at WooCommerce.com) and track every step of the checkout process, including coupon usage, payment methods, and the exact moment when customers drop out of the flow.
That data is crucial to diagnose where abandonment is happening during your checkout process—which will allow you to make changes to improve your conversions.
WooCommerce checkout page customization without a plugin
As above, the easiest way to customize your WooCommerce checkout is with the plugins, but it’s not the only way. WordPress is an open-source CMS, so if you’ve got the coding skills, you can edit the code yourself.
How you customize the checkout is entirely up to you, but here are some key tips to customizing the checkout.
- Work in a child theme. This ensures that your customizations aren't lost when the main theme is updated.
- Override checkout templates by copying the templates you want to change from wp-content/plugins/woocommerce/templates/checkout to wp-content/themes/your-child-theme/woocommerce/checkout and make your modifications there.
- Customize fields using the woocommerce_checkout_fields filter hook to modify checkout fields. This can be used to change field order, labels, placeholders, and more.
- Add custom fields if you need extra information from your customers, you can add custom fields. For instance, you might want to add a 'Delivery Instructions' text area.
- Style changes can modify the look of the checkout page and add your CSS to the child theme's style.css.
- JavaScript enhancements can improve UX. You can use jQuery to show/hide fields based on user selections or validate input in real time.
Remember, modifying your site’s code always carries risks if you’re not a pro. Regularly back up your website, and be cautious with updates, as WooCommerce updates may require adjustments to your customizations. If you haven’t got a dev to help with updates later, it might be better to stick with plugins.
Finally, test, test, and test again! After making changes, thoroughly test the checkout process to ensure no issues arise from the modifications. Ensure you test on various devices and browsers. The last thing you want is a failing checkout!
Other tips for your WooCommerce checkout page
With an open-source CMS, your checkout customization options are endless! That said, you don’t want to deviate too far from user expectations when it comes to checkout flow; there’s no need to reinvent the wheel!
Here are some other ideas on how to further customize your WooCommerce checkout and the plugins to help you do it.
Offer gift wrap or gifting options
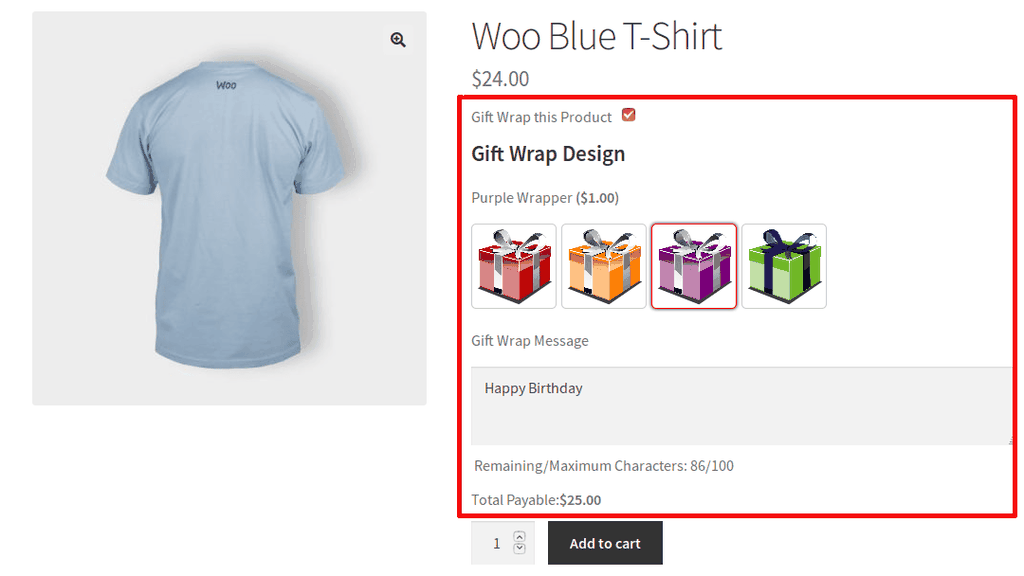
If your ecom site sells products that make great gifts, you might be able to incentivize that sale with gift wrap options.
Gift Wrapper is a great option and easily integrates with WooCommerce. At just $49/year, Gift Wrapper elevates your checkout with gifting options for individual products or for entire orders at checkout. Your users will also be able to add gift notes.
You can add optional additional fees for gift wrapping.
Trigger free shipping

We already know that unwanted expenses at checkout can increase abandonment. During the checkout process, you can trigger free shipping on certain orders such as orders that reach a certain amount. This type of incentive has an obvious benefit — fewer abandonments — but this can also encourage shoppers to spend more.
Add free items based on product purchases
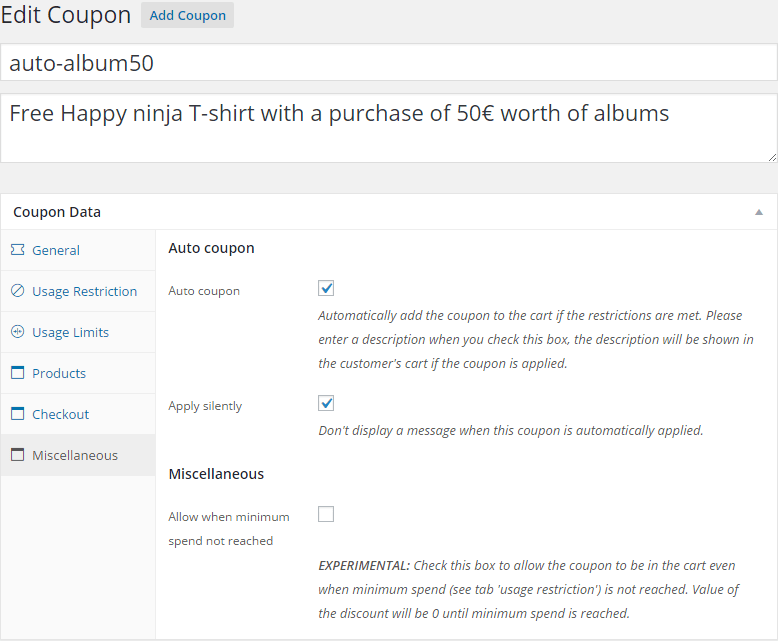
You can increase your coupon functionality with WooCommerce Extended Coupon Features. It’s a free plugin and allows you to restrict coupons by rules (such as shipping or payment methods.)
With the pro version, you can add free products to the cart based on coupon rules; think free shakers with protein, for example.
More plugins to edit your WooCommerce checkout page
If you’re still looking for ideas, here are some plugins to improve your WooCommerce checkout flow.
Guest checkout
A one-click checkout can speed up the checkout process and prevent cart abandonment due to overwhelm. Implement a one-click checkout with the Cashier plugin ($149/year).
WooCommerce Multiple Email Recipients
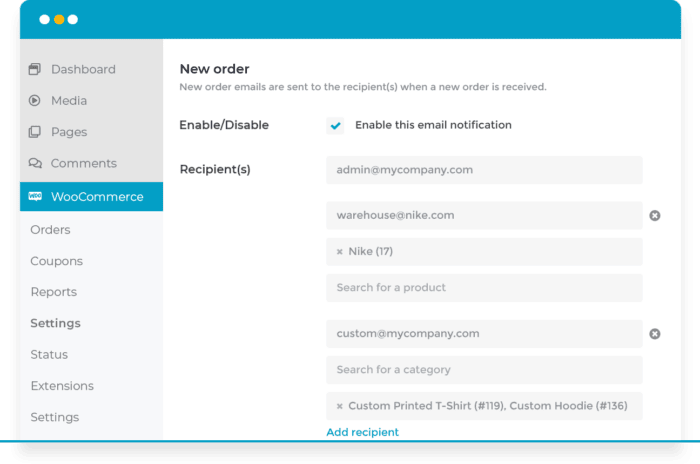
For sites serving a B2B market, multiple email recipients can be a useful plugin for businesses as they may want receipts and comms to go to various members within the buyer’s business.
Multiple Email Recipients allow just that. The plugin costs from $49/year.
Related: WooCommerce email marketing tools to send automated emails.
Incentivize sales with Cart Notices
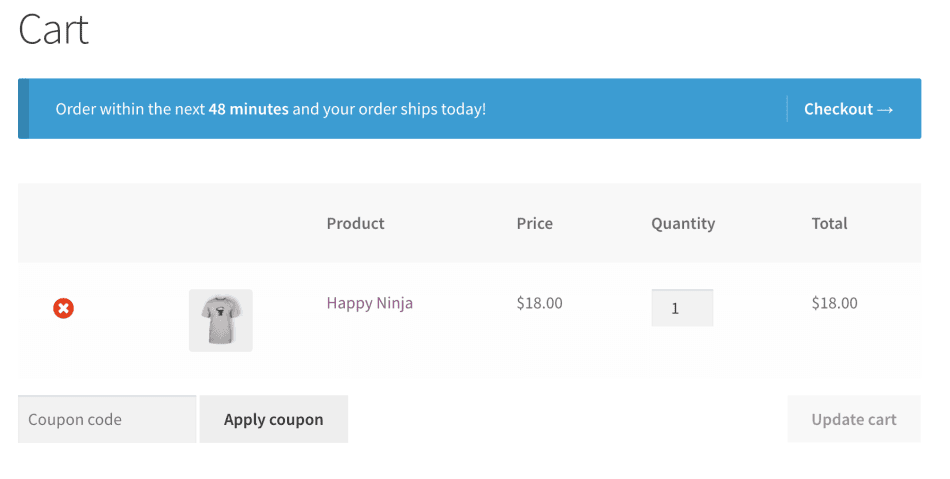
If a buyer has made it all the way to checkout and is about to miss out on a deal, a cart notice might give them the prompt they need to increase their spend before they checkout.
Cart Notice is $49/year and adds dynamic notices to your cart. In the screenshot above, the message reads, “Order within the next 49 minutes and your order ships today!”
The promise is fast shipping and a little pressure to put the order in now may encourage a purchase. This type of notice can also be used to add a little scarcity (eg. only 1 left) or encourage users to buy more for free shipping (eg. Spend $10 to qualify for free shipping.)
Your WooCommerce checkout questions answered
If you’ve still got questions on WooCommerce, check out the frequently asked questions below.
Is WooCommerce checkout free?
Yes! WooCommerce checkout is free. With the standard version, you’ll have enough features and functionality for a basic checkout experience.
How do I make fields required or optional on the WooCommerce checkout page?
You can edit checkout fields using a plugin like Checkout Field Editor. Using a plugin like this is the easiest way and anyone could do it.
That said, if you're comfortable with PHP and editing your theme's (or rather the child theme's) functions.php file, you can use WooCommerce's filter hooks.
If you use this method make sure to hire someone who knows what they’re doing and bear in mind, that any custom code could need revisiting in the future as WordPress is updated.
What is advanced checkout fields for WooCommerce?
Advanced checkout fields for WooCommerce are additional or custom fields that you can add to your checkout. Basically, any field that isn’t in the standard/given checkout experience once you’re rolling with WooCommerce.
How do I display coupons on the WooCommerce checkout page?
You can share coupons as part of the standard WooCommerce plugin. Go to the WooCommerce plugin from your WordPress dash > Marketing > coupons. There, you can create coupon codes and assign rules such as amount, usage limits, expiry and more.
How do I add a pop up to my checkout page in WooCommerce?
You can add a checkout pop-up to thank your customers or provide a discount to incentivize a sale. You can add a pop-up with code if you’ve got the skills or use a plugin like Pop-Up Maker.
Key takeaways
The checkout flow at your WooCommerce store can make or break a sale. And with the average cart abandonment rate right around 70 percent, you’ll want to take the proper steps to reduce that number and improve your conversions.
The strategies for optimizing your checkout flow are:
- Eliminate unnecessary fields from the checkout. Figure out what fields you can cut, then use an extension like Checkout Field Editor to cut them.
- Streamline your checkout process. Use visual cues to show how many steps there are in the checkout, or distill the checkout process down to a single page.
- Offer multiple payment options. One out of 12 carts are abandoned because a customer wants to use a payment method that the store isn’t offering. Determine what payment methods your target customers want, then use payment gateway extensions to offer those options.
- Use visual cues after an item has been added to the cart. Reduce confusion by using visual cues after a product has been added to the cart—or redirecting buyers to the checkout page immediately.
- Skip or simplify the signup process. Allow visitors to either checkout as guests, or use an extension like WooCommerce Social Login to allow customers to log into your site with one of their existing social profiles.
- Eliminate the surprises. Surprise fees are the top reason for cart abandonment. Be upfront about fees on your product pages, and consider adding features like a shipping calculator or early coupon code entry.
- Upsell useful services. Some services you upsell, like gift wrapping and insurance, might actually help close a sale by filling a need for a customer. An extension like WooCommerce Checkout Add-Ons is a quick way to implement those types of upsells.
- Pay attention to your analytics. Use the WooCommerce Google Analytics Pro extension to get advanced eCommerce metrics so you can track each stage of your checkout flow, spot problems, and figure out solutions.
The following extensions mentioned in this post are included at no additional charge in the GoDaddy Managed WooCommerce Stores hosting package:
- Authorize.Net
- Global Payments HPP
- WooCommerce Social Login
- WooCommerce Checkout Add-Ons
- WooCommerce Google Analytics Pro
Learn more and see GoDaddy's WooCommerce hosting options.
Disclaimer: All trademark rights belong to their respective owners. Third-party trademarks are used here for demonstrative and educational purposes only, use does not represent affiliation or endorsement.