Google remains one of the most widely utilized traffic sources for ecommerce businesses. While merchants have traditionally relied on the standard text-based search ads to gain exposure, the growing popularity of Google Shopping is helping businesses reach even more of their target audience.
In this guide, we will walk through how to integrate Google Shopping with your WooCommerce store to get your products in front of more potential customers.
Save money selling products, your way
Our Managed WordPress eCommerce includes more than $5,000 in free premium WooCommerce extensions, empowering you to sellproducts, your way, with additional customization.
Specialized store extensions can cost hundreds, even thousands of dollars per year once you get them all added to your store.
But with our Managed WordPress eCommerce, you can build the exact store you needed to sell subscriptions, book appointments, enable digital downloads and much, much more — with free access to more than $5,000 in premium WooCommerce extensions.
What are the benefits of using Google Shopping Ads?
Higher conversion potential
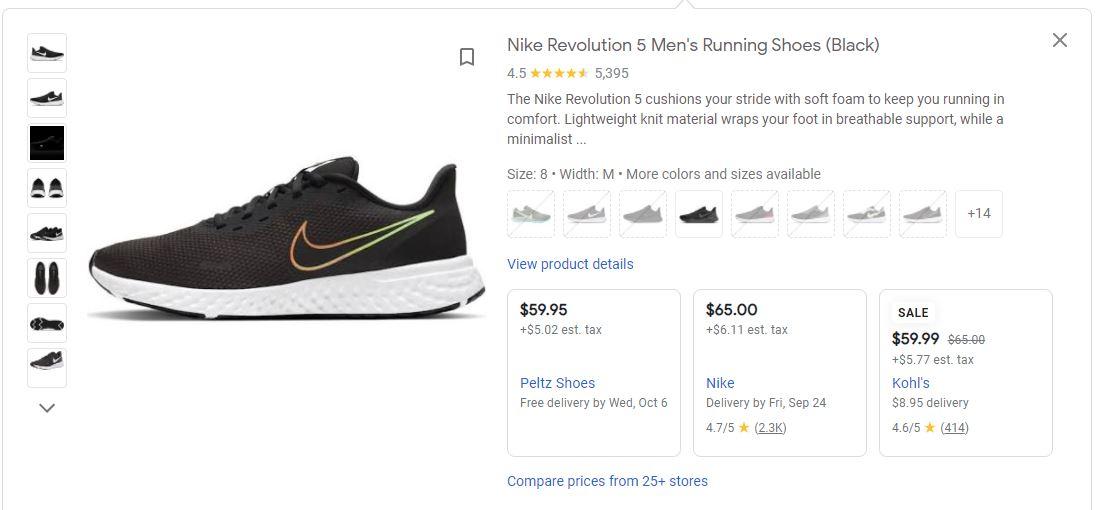
People who click on Shopping ads have a greater purchase intent than those clicking traditional search ads. The main reason for this is that shopping ads give the customer more information about the product prior to visiting your site.

They can see the item’s images, price, description, and even rating and reviews, depending on how your feed is set up. With this information, customers that are not interested in a particular product will not proceed to your site, saving you from paying Google for the click.
Better product discovery
The more people you can reach with your product listings, the higher your potential sales. With Google Shopping, you can upload your products to the comparison shopping engine to get in front of customers earlier in the discovery process.
Easier to manage ad campaigns
Managing Google Shopping campaigns is much less tedious than managing a Google Search campaign. With a search campaign, you need to invest the effort in creating multiple ad groups and copy for each type of product you sell. You also need to research what keywords to use.
This process becomes increasingly challenging the more your product catalog grows.
With a Shopping campaign, there is far less work to get your ads up and running. You do not need to create copy for every single ad group, but rather you simply need to fine-tune the settings for your product feed.
Google Shopping will then automatically pull all the details for your products to display them to customers. You can add negative keywords and adjust your budget/bidding as needed, but the main mechanism of a successful shopping campaign is the simple ability for customers to browse and scan your items on Google the same way they would when using an online marketplace.

Google Shopping product feed requirements
Your product data feed is a spreadsheet file that organizes the different items in your product catalog. To make your items eligible for free Google Shopping listings and shopping campaigns, you must upload this feed to Google Merchant Center (the platform used to manage Google Shopping for your business).
The columns of the shopping feed contain a list of product attributes. These are the data points that describe the item. Google scans the attributes for the various items across Merchant Center when choosing which products to surface for user searches.
Below are the attributes you can include in your product feed:
- Product ID
- Product Title
- Product Description
- Product Type
- Google Product Category
- Product URL
- Product Image URL(s)
- Stock Availability
- Regular Price
- Product Condition
- Brand Name
- GTIN (Global Trade Item Number)
- MPN (Manufacturer Part Number)
- Identifier
- Adult Content
- Multipack
- Bundle
- Material
- Age Group
- Color
- Gender
- Size
- Pattern
- Item Group ID
Some of these attributes are mandatory across all products while others are optional. Depending on an item’s category, additional fields may be required.
For instance, size is not a standard requirement for all products on Google Shopping but it is a requirement for any item listed in the Apparel & Accessories category.
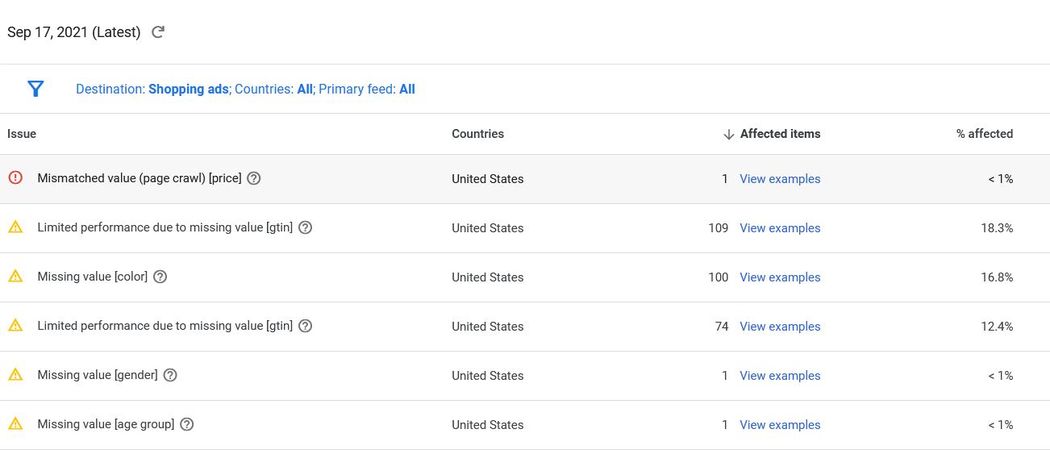
Google has strict specifications for the data inputs for each attribute. For example, your product link must include the https:// part of the URL string. If your data is not formatted correctly, Google will not be able to process the feed.
Similarly, Google crawls the metadata on your landing pages to make sure it matches what is in your product feed. If there are any discrepancies Google will flag it as an error. As long as the issue remains outstanding, that item will be ineligible to appear in Google Shopping.
In addition to your product feed, there are some website requirements you will need to adhere to if you want your products to be eligible for Google Shopping.
- Refund policy: Your website must have a refund and return policy that is easily accessible on your site. Even if you don’t offer returns, there must be a defined policy in place.
- Secure checkout: All payment and transaction processing must take place through a server with a valid SSL certificate.
- Payment methods: Your website must clearly display all the payment methods you accept for orders.
How to create a Google Shopping feed for WooCommerce
Let’s examine two different approaches for adding your product feed to Google Merchant Center, one manual the other automated.
Create a feed manually with a spreadsheet
If you want to manually connect your WooCommerce product catalog to Google Merchant Center, you must export the feed as a spreadsheet and then directly upload the file.
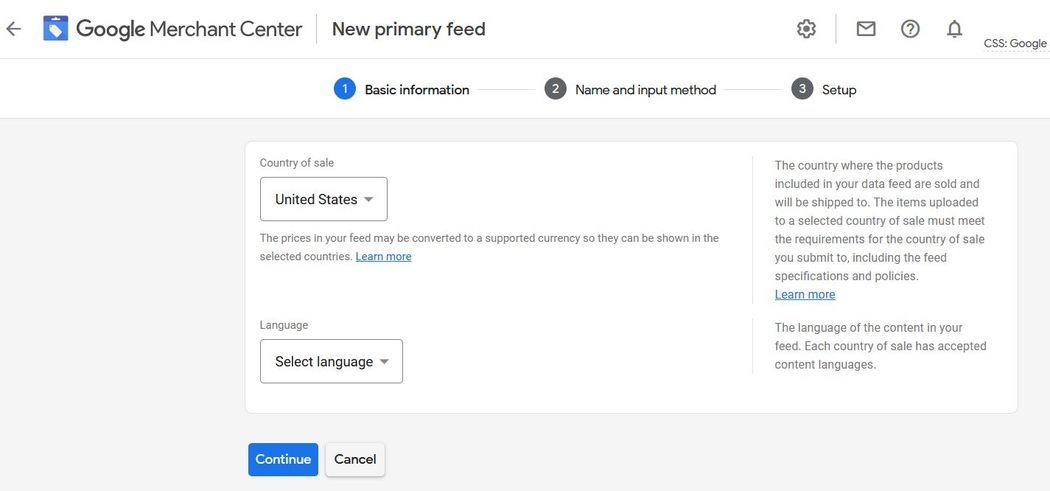
In Merchant Center go to Products > Feeds. Click the plus icon to create a new feed.
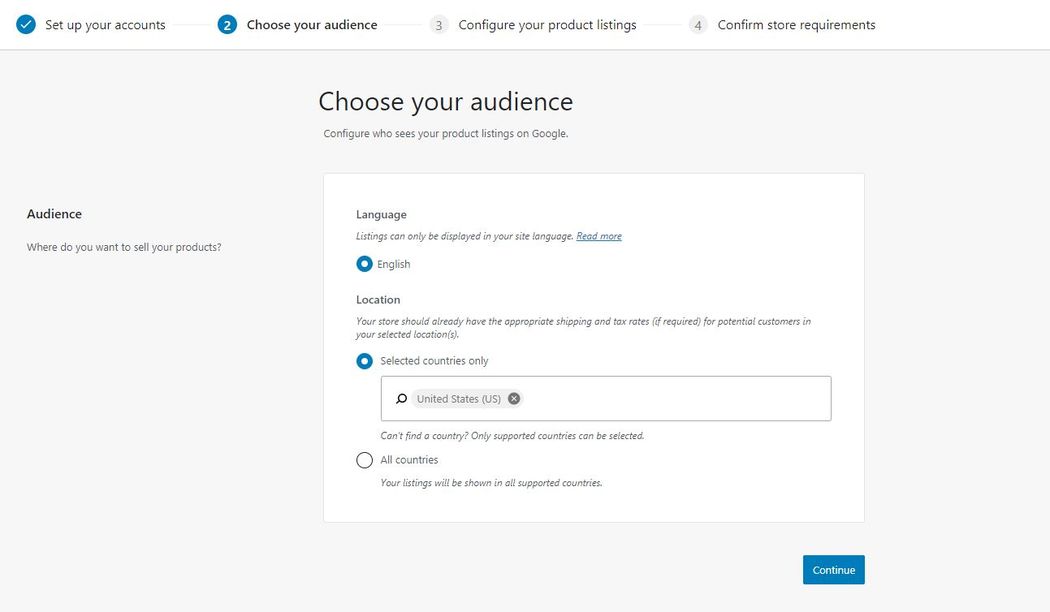
Choose your country and language and click Continue.
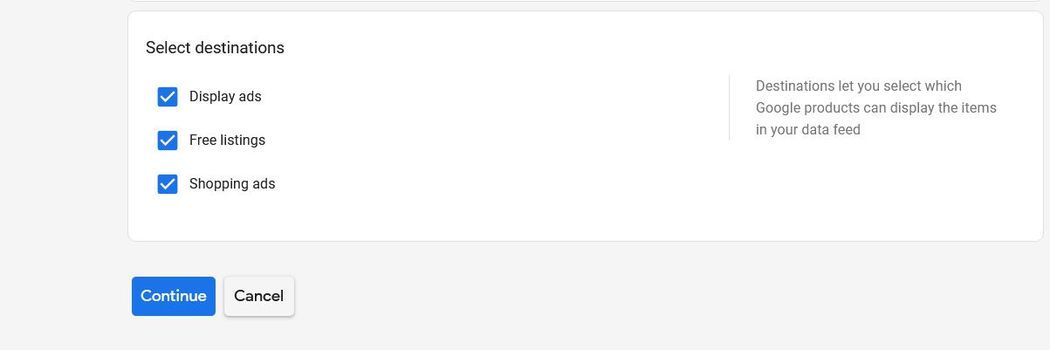
Select the destination where you want your products to appear and click Continue.
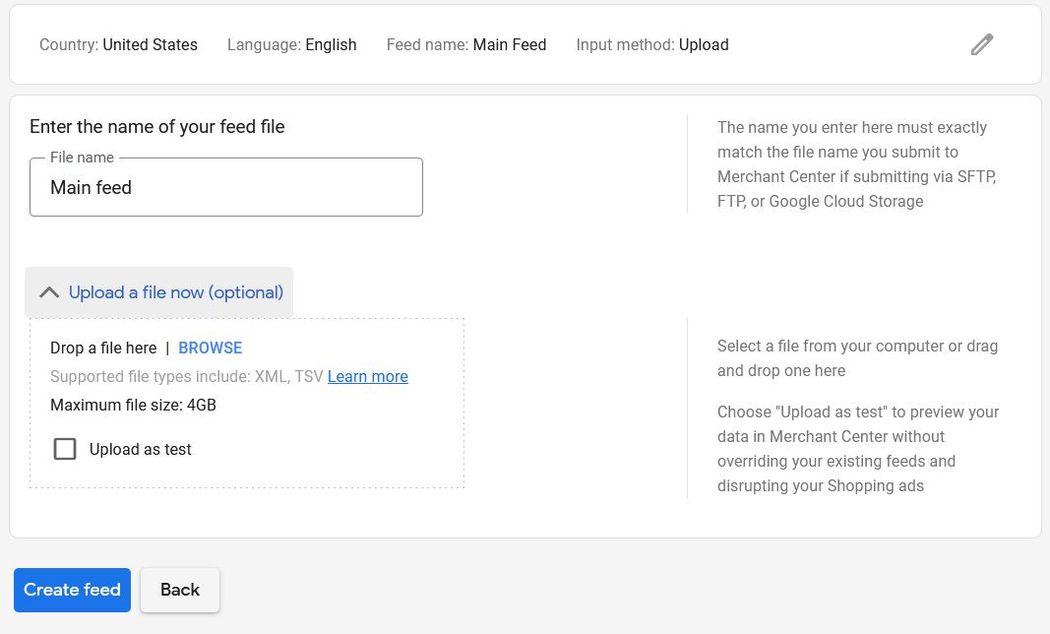
Next, you’ll name the feed and choose an input method.
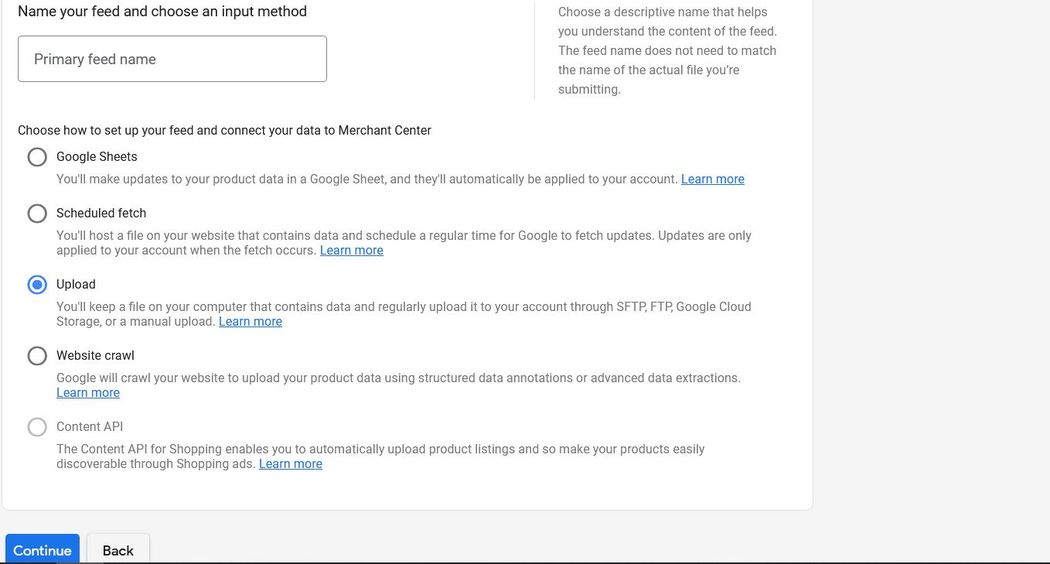
For our manual example, you’ll want to select Upload. On the next page, you can choose to upload the file from your computer or to submit the file via SFTP, FTP, or Google Cloud Storage.
If uploading directly, you can test the file to ensure everything is structured properly. Once you verify that your feed is in order, click Create feed.
That’s it, your feed is now set up and ready to go. It will take Google a few minutes to scan your products, after which you should see them appear in your Merchant Center account.
If you want to work within a spreadsheet you should consider choosing Google Sheets as your input method. With Google Sheets, Merchant Center can automatically fetch your feed when changes are made. This can save you from gap periods where the data in your feed doesn’t match that on your site.
Create a feed automatically using a WooCommerce extension
Another way to upload your product feed to Google Merchant Center is to use a WooCommerce extension. With an extension, you can speed up how long it takes to structure your feed by automatically mapping your product attributes to Google attributes.
You can also set default values for attributes that are consistent across your products such as age group or product condition.
But the biggest benefit to using an extension is the ability to automatically sync your feed with Merchant Center instead of having to manually edit and re-upload a file. Depending on the tool you use, you can have any new changes instantly pushed to Google or you can schedule the extension to fetch the feed at a specified date.
There are plenty of Google Shopping plugins for WooCommerce stores. Below, we will examine how to use the Google Listings & Ads extension to quickly create a product feed and connect your store to Merchant Center.
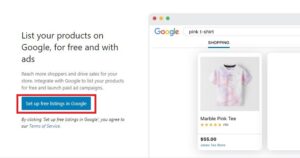
The extension is free and available on WooCommerce.com. After you download the plugin, you’ll want to go to Marketing > Google Listings & Ads.
Click Set up free listings in Google.
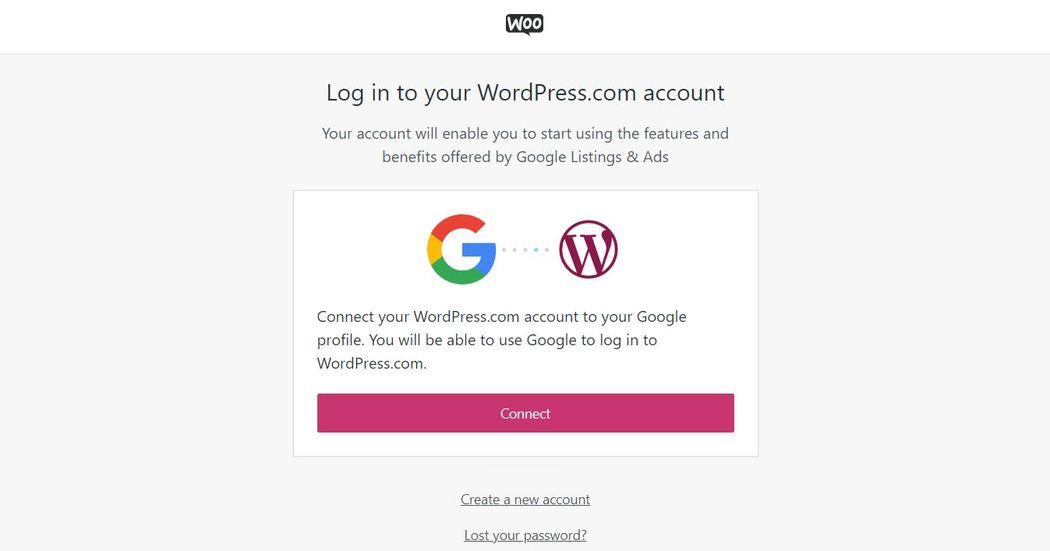
You’ll then need to connect your WordPress.com account. Sign in to your account and click Connect to approve the connection.
Next, you’ll want to connect your Google. After you click Connect, you will receive a prompt to grant the extension access to your account. Check the boxes to enable the following:
- Manage your Adwords campaigns
- Manage your product listings and accounts for Google Shopping.
- Manage your new site verifications with Google.

Now you need to connect your Merchant Center account or create one if you do not have one. When the extension syncs with your Google account, it will automatically detect whether you have a Merchant Center account for that profile.
If you do not, you will see a button that says Create Account. This will direct you to the registration page for Google Merchant Center.

If you already have a Google Merchant Center account, the extension automatically populates your various account IDs. Select the appropriate account and click Connect.

It will take a moment for the account to sync. Once it is complete click Continue.
Choose your language and location.
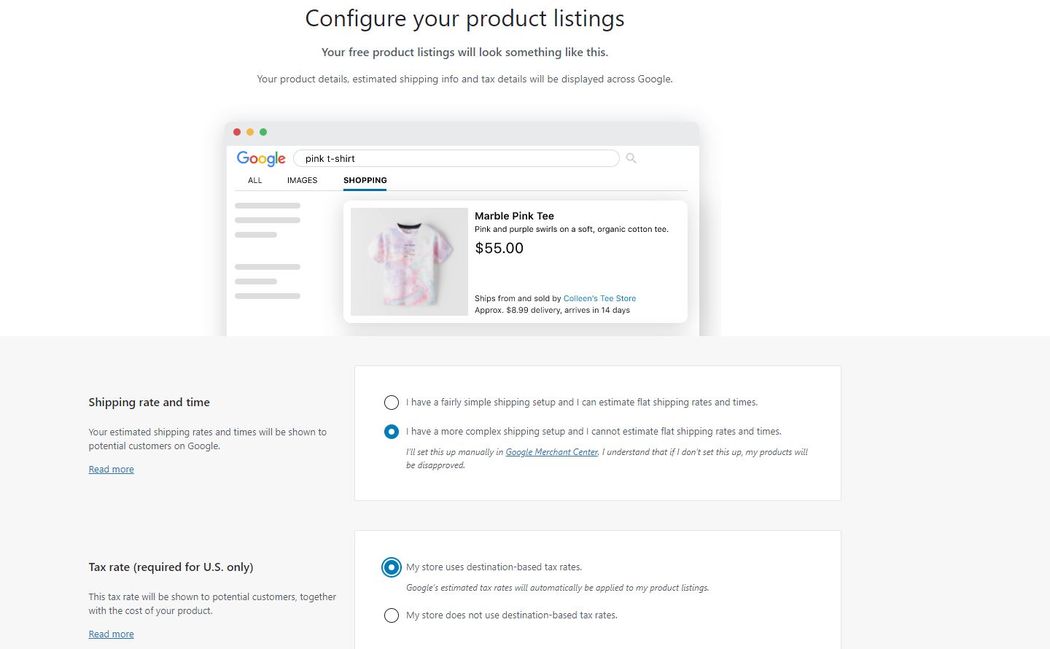
Next, you will need to configure your shipping and tax settings. You can assign a flat rate shipping fee that is applied to all items or you can assign different rates based on the product.
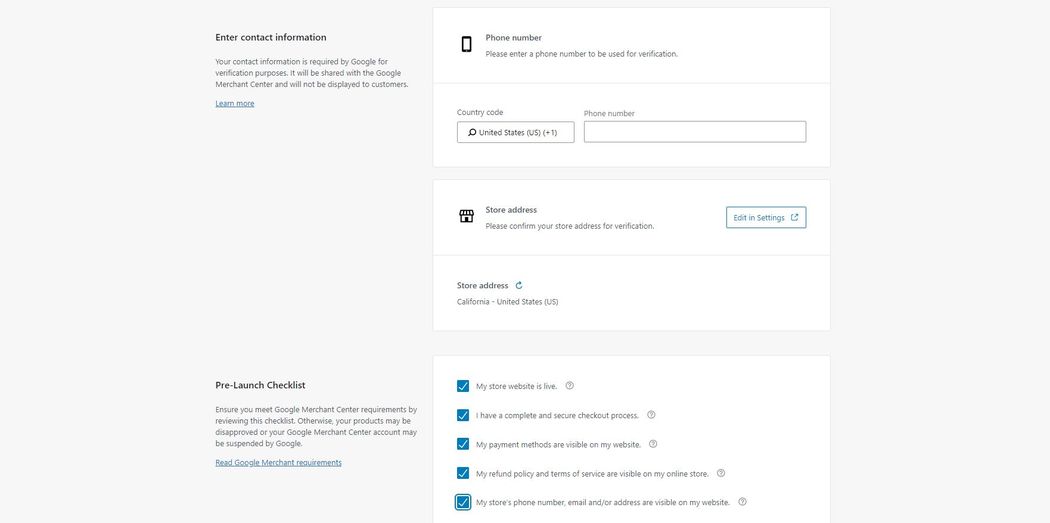
On the next page, you will provide your contact information and verify that your website meets the Google Merchant Center requirements.
After the sync is complete, you can review your product feed by going to Marketing > Google Listings & Ads > Product Feed.
The dashboard will show how many products are active in Google Merchant Center and how many were disapproved because of errors.
If there are any issues with your products, the plugin will provide details about the problem so you can make any necessary changes.

By default all items in your catalog have the Channel Visibility settings set to Sync and show, meaning that they are being pushed to your Merchant Center feed.
To disable a product go to Marketing > Google Listings & Ads > Product Feed. Check the box for the product and click Select channel visibility. Select don’t sync and show and click Apply.

To edit the attributes for an individual product go to Product data > Google Listings and Ads.
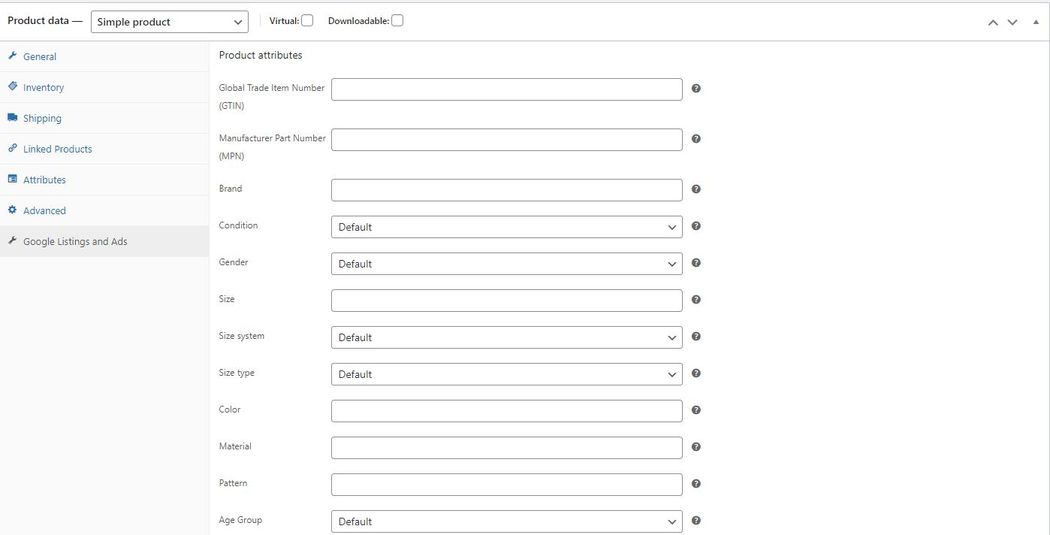
The mandatory attributes are automatically set as the default value defined in your settings. If you want to modify these or any of the other attributes, click the dropdown menu and select the new value. If there isn’t a selection menu for the attribute, you can enter a custom value.
Once you optimize the attributes for all your products, you can begin using them in Google Shopping campaigns. If you plan to use Smart Shopping campaigns, you can get these up and running directly from WordPress using the extension.
Tips for optimizing your Google Shopping feeds and campaigns
Custom bids by product ID
You can increase the efficacy of your shopping ads by bidding on the product level instead of the campaign level. Depending on your business, items in your product catalog may have drastically different margins.
If you set a max bid for all items in the campaign, you could find yourself overpaying on clicks for items that don’t yield much profit.
By bidding on a product level, you get more control over your bidding strategy. You can set a unique bid for each product to not waste advertising budget on low-margin products.
Format titles for discoverability and engagement
When creating the titles for your Google Shopping listings, it is best practice to include attributes and important product features. This approach differs from how you would ideally name products on your site, but it helps Google better understand your items so that it can surface them for customer searches.
Adding more descriptive elements to your titles also makes your listings more appealing to users, increasing the chances they click through to your website.
Below are a few examples of how you can structure Google Shopping titles for different product categories:
- Apparel products: Brand + Gender + Product Type + Attributes
- Electronics: Brand + Product Type + Attributes + Model #
- Furniture: Brand + Product type + Attributes + Measurements
Use product type
While product type is an optional attribute, you should treat it like it’s mandatory. The pre-defined collection of categories in Google’s taxonomy may not include a category that is a true fit for your items.
Product type is a custom value that allows you to categorize your items however you see fit. By adding a product type to each of your items, you provide better clarity into the nature of the product. With this detail, Google can serve your products to more relevant audiences.
Custom labels
Custom labels give you the ability to create even more groupings for your products. You can label your products by any characteristic that you want whether it’s color or how much it costs to source the item. You can then use these segments to create more targeted campaigns.
For example, you can use one of your custom labels for margins to split products into high-profit and low-profit items.
Another helpful way to use custom labels is to mark seasonal items. For instance, maybe you sell holiday decorations. In this case, you can apply a seasonal custom label so that you can easily exclude these items or lower their spend as the demand cycles down.
Conclusion
Google Shopping is a great way to get your ecommerce business in front of a large audience. If you want to make the most of this bountiful source of traffic you must set up your product feed for success.
By following the tips in this guide, you can seamlessly sync your WooCommerce products with Google Shopping to reach the customers most relevant to your business.