
WooCommerce 2.0 introduced a lot of new features to the core plugin, one being a new class-based implementation for emails. This makes it really easy to add your own custom email types to WooCommerce. In this article, we’re going to create a sample custom email that’s sent when an order with expedited shipping is received. A lot of larger sites disable new order emails if they receive a lot of orders, but most will still want to be aware of orders that need to be shipped immediately. Feel free to skip to the completed plugin if you want to simply use it as a base for your own custom email.

Go from idea to online in minutes with GoDaddy Airo™
Get started now.
First, add a folder to your site’s wp-content/plugins directory named woocommerce-expedited-order-email. Fire up your favorite text editor or IDE and then create a blank PHP file named woocommerce-expedited-order-email.php. Now add this code to the file and save:
<?php
/**
 * Plugin Name: WooCommerce Custom Expedited Order Email
 * Plugin URI: https://godaddy.com/garage/how-to-add-a-custom-woocommerce-email/
 * Description: Demo plugin for adding a custom WooCommerce email that sends admins an email when an order is received with expedited shipping
 * Author: GoDaddy
 * Author URI: http://godaddy.com
* Version: 0.1 * * License: GNU General Public License v3.0 * License URI: http://www.gnu.org/licenses/gpl-3.0.html * */ if ( ! defined( 'ABSPATH' ) ) exit; // Exit if accessed directly
If you’ve never done this before, congrats on creating your first WordPress plugin. We won’t cover much else about creating WordPress plugins in the rest of this article, so if you want to learn more about that, the best place to start is Writing a Plugin in the WP codex. Finally, browse to Plugins page in the WordPress admin and activate the plugin. Wheee, it’s aliiiveeeee! Sadly it doesn’t do anything yet. Deactivate the plugin and read on.
WooCommerce loads all the default emails inside the WC_Emails class. These class names are run through a the woocommerce_email_classes filter, which allows us to add our own custom email class, or even remove default ones that aren’t needed. We’re going to add a custom one using a simple function:
/**
 *  Add a custom email to the list of emails WooCommerce should load
 *
 * @since 0.1
 * @param array $email_classes available email classes
 * @return array filtered available email classes
 */
function add_expedited_order_woocommerce_email( $email_classes ) {

    // include our custom email class
    require( 'includes/class-wc-expedited-order-email.php' );

    // add the email class to the list of email classes that WooCommerce loads
    $email_classes['WC_Expedited_Order_Email'] = new WC_Expedited_Order_Email();

    return $email_classes;

}
add_filter( 'woocommerce_email_classes', 'add_expedited_order_woocommerce_email' );
Add this code to your woocommerce-expedited-order-email.php after the above section. This simply adds our custom email class to the list of emails that WooCommerce loads. Note that if you tried to activate and run the plugin, you’ll get a fatal error because we haven’t actually created our custom email class yet. If you don’t quite understand how this works, read this article on using filters.
Now the real fun begins! We’re going to build our custom email class that will handle the actual email content as well as the trigger for when it should be sent. Create a new folder named includes inside the existing woocommerce-expedited-order-email folder and add a new blank PHP file named class-wc-expedited-order-email.php. Add this code which will act as a very basic skeleton:
<?php

if ( ! defined( 'ABSPATH' ) ) exit; // Exit if accessed directly

/**
 * A custom Expedited Order WooCommerce Email class
 *
 * @since 0.1
 * @extends \WC_Email
 */
class WC_Expedited_Order_Email extends WC_Email {


} // end \WC_Expedited_Order_Email class
This code creates a simple email class that extends the abstract WC_Email, which gives us access to all of the parent email class methods & members. We’ll override some of them to make the class specific to our needs. Note that the following code should all go inside the class we just created above. Let’s start with the constructor:
    /**
     * Set email defaults
     *
     * @since 0.1
     */
    public function __construct() {

        // set ID, this simply needs to be a unique name
        $this->id = 'wc_expedited_order';

        // this is the title in WooCommerce Email settings
        $this->title = 'Expedited Order';

        // this is the description in WooCommerce email settings
        $this->description = 'Expedited Order Notification emails are sent when a customer places an order with 3-day or next day shipping';

        // these are the default heading and subject lines that can be overridden using the settings
        $this->heading = 'Expedited Shipping Order';
        $this->subject = 'Expedited Shipping Order';

        // these define the locations of the templates that this email should use, we'll just use the new order template since this email is similar
        $this->template_html  = 'emails/admin-new-order.php';
        $this->template_plain = 'emails/plain/admin-new-order.php';

        // Trigger on new paid orders
        add_action( 'woocommerce_order_status_pending_to_processing_notification', array( $this, 'trigger' ) );
        add_action( 'woocommerce_order_status_failed_to_processing_notification',  array( $this, 'trigger' ) );

        // Call parent constructor to load any other defaults not explicity defined here
        parent::__construct();

        // this sets the recipient to the settings defined below in init_form_fields()
        $this->recipient = $this->get_option( 'recipient' );

        // if none was entered, just use the WP admin email as a fallback
        if ( ! $this->recipient )
            $this->recipient = get_option( 'admin_email' );
    }
This sets up the email and adds a title and description that’s displayed under WooCommerce > Settings > Emails. It also sets a default heading/subject for the email and defines the templates used when sending the email. Much of these defaults are the same as the default new order email. Finally, it adds the triggers for when the email should be sent. In our case we’re simply sending the email when an order moves from the “pending”/”failed” to “processing” order status. Let’s add the trigger method now, which is where the email is actually sent:
    /**
     * Determine if the email should actually be sent and setup email merge variables
     *
     * @since 0.1
     * @param int $order_id
     */
    public function trigger( $order_id ) {

        // bail if no order ID is present
        if ( ! $order_id )
            return;

        // setup order object
        $this->object = new WC_Order( $order_id );

        // bail if shipping method is not expedited
        if ( ! in_array( $this->object->get_shipping_method(), array( 'Three Day Shipping', 'Next Day Shipping' ) ) )
            return;

        // replace variables in the subject/headings
        $this->find[] = '{order_date}';
        $this->replace[] = date_i18n( woocommerce_date_format(), strtotime( $this->object->order_date ) );

        $this->find[] = '{order_number}';
        $this->replace[] = $this->object->get_order_number();

        if ( ! $this->is_enabled() || ! $this->get_recipient() )
            return;

        // woohoo, send the email!
        $this->send( $this->get_recipient(), $this->get_subject(), $this->get_content(), $this->get_headers(), $this->get_attachments() );
    }
This is where the magic happens! This method passes in the Order ID, which we use to instantiate a new WC_Order. With this object we can then check if the shipping method is expedited. In this example, simple flat rate shipping is used, but you could just as easily check the shipping ID if FedEx/UPS was being used. If the shipping method isn’t expedited, we return which prevents the email from being sent. We’re not quite finished with the class yet, we still need to define the content that is used for the email:
    /**
     * get_content_html function.
     *
     * @since 0.1
     * @return string
     */
    public function get_content_html() {
        ob_start();
        woocommerce_get_template( $this->template_html, array(
            'order'         => $this->object,
            'email_heading' => $this->get_heading()
        ) );
        return ob_get_clean();
    }


    /**
     * get_content_plain function.
     *
     * @since 0.1
     * @return string
     */
    public function get_content_plain() {
        ob_start();
        woocommerce_get_template( $this->template_plain, array(
            'order'         => $this->object,
            'email_heading' => $this->get_heading()
        ) );
        return ob_get_clean();
    }
These are copied from the default Admin New Order email because we’re using the same exact template. If you were using a custom template, these methods are helpers to pass whatever data you need to the custom template. Note here they are passing the order object and the email heading string.
Finally we need to define the settings for the email, so an admin can easily change the recipients or subject/headings, or disable the email altogether. This code is again copied from the default Admin New Order email class:
    /**
     * Initialize Settings Form Fields
     *
     * @since 0.1
     */
    public function init_form_fields() {

        $this->form_fields = array(
            'enabled'    => array(
                'title'   => 'Enable/Disable',
                'type'    => 'checkbox',
                'label'   => 'Enable this email notification',
                'default' => 'yes'
            ),
            'recipient'  => array(
                'title'       => 'Recipient(s)',
                'type'        => 'text',
                'description' => sprintf( 'Enter recipients (comma separated) for this email. Defaults to <code>%s</code>.', esc_attr( get_option( 'admin_email' ) ) ),
                'placeholder' => '',
                'default'     => ''
            ),
            'subject'    => array(
                'title'       => 'Subject',
                'type'        => 'text',
                'description' => sprintf( 'This controls the email subject line. Leave blank to use the default subject: <code>%s</code>.', $this->subject ),
                'placeholder' => '',
                'default'     => ''
            ),
            'heading'    => array(
                'title'       => 'Email Heading',
                'type'        => 'text',
                'description' => sprintf( __( 'This controls the main heading contained within the email notification. Leave blank to use the default heading: <code>%s</code>.' ), $this->heading ),
                'placeholder' => '',
                'default'     => ''
            ),
            'email_type' => array(
                'title'       => 'Email type',
                'type'        => 'select',
                'description' => 'Choose which format of email to send.',
                'default'     => 'html',
                'class'       => 'email_type',
                'options'     => array(
                    'plain'     => 'Plain text',
                    'html'      => 'HTML', 'woocommerce',
                    'multipart' => 'Multipart', 'woocommerce',
                )
            )
        );
    }
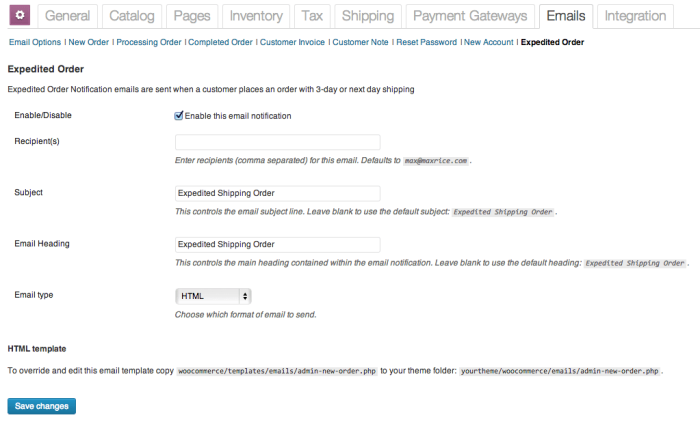
You can add your own settings here by following the same array format as above. And with that, we’re finished! Head over to the Plugins page and click “Activate”. Assuming you haven’t made any errors, you should see “plugin activated”. Go to WooCommerce > Settings > Emails and you should see our new email added:
Woohoo! There’s a lot more to the WooCommerce email system and I encourage you to read through the different email types on the WooCommerce repository to more fully understand them.
The completed plugin from the walkthrough above is available on Github, or you can just download a zip.