
Google Analytics is a powerful tool for gaining a comprehensive understanding of your website performance. That said, properly configuring Google Analytics to track the right data can be tricky, particularly for ecommerce stores. In this guide, we will examine how to properly set up Google Analytics for a WooCommerce site to provide insightful metrics you can use to improve your business.
Save money selling products, your way
Our Managed WooCommerce Stores includes more than $5,000 in free premium WooCommerce extensions, empowering you to sell products, your way, with additional customization.
Specialized store extensions can cost hundreds, even thousands of dollars per year once you get them all added to your store.
But with our Managed WooCommerce Stores, you can build the exact store you needed to sell subscriptions, book appointments, enable digital downloads and much, much more — with free access to more than $5,000 in premium WooCommerce extensions.
Important metrics to track in Google Analytics
Google Analytics lets you easily monitor a variety of metrics in WooCommerce. This includes basic web traffic metrics, such as pageviews as well as important ecommerce metrics including:
- Conversion rate: The percentage of your website visitors that result in sales
- Average order value (AOV): The average amount customers spend with each purchase
- Abandoned cart rate: The percentage of people that leave your site with items still in their cart
- Customer Lifetime Value: The average amount of revenue you earn over the course of a customer’s life.
- Product revenue: Revenue generated by each product
- Sales: Total number of unique purchases
To accurately measure these ecommerce metrics in Google Analytics, you must have ecommerce tracking properly set up. Enabling the functionality in Google Analytics is easy enough.
The trick is getting your website to push all the necessary transactional data back to Google Analytics to calculate the ecommerce metrics. For example, Google needs to know the value of each order to calculate the total revenue for each product. The way Google gets this information is through tracking tags placed on your website.

Integrating Google Analytics with a WooCommerce extension
You can avoid the process of manually adding tracking codes to your site by using a WordPress plugin to handle it for you. There are a myriad of plugins you can choose from. The most powerful is the WooCommerce Google Analytics Pro extension, included in the GoDaddy Managed WooCommerce Stores plan.
The extension seamlessly adds advanced event tracking to your WooCommerce website. It then pushes the events to Google Analytics, to track ecommerce metrics such as conversion rate and sales per product.
Once you’ve activated the plugin, go to WooCommerce > Settings > Integrations > Google Analytics Pro to configure your settings.
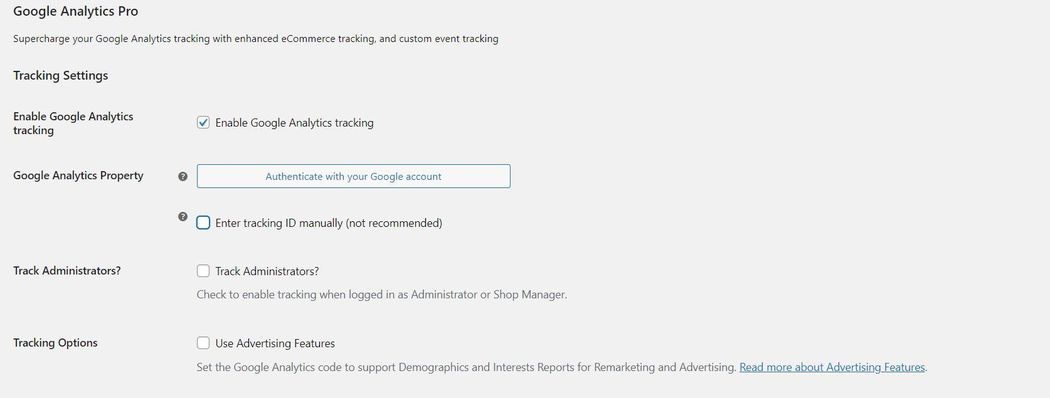
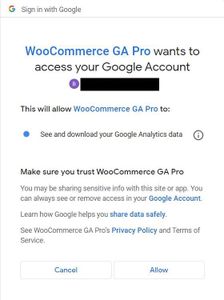
The first thing you need to do is connect your Google Analytics account to the plugin. There are two ways to do this. The first is to authenticate your account by signing in. The second is to manually add your Google Analytics tracking ID.
To complete the authentication process, click Authenticate with your Google Account. Select the account you want to link, and Google will ask you to allow the connection.
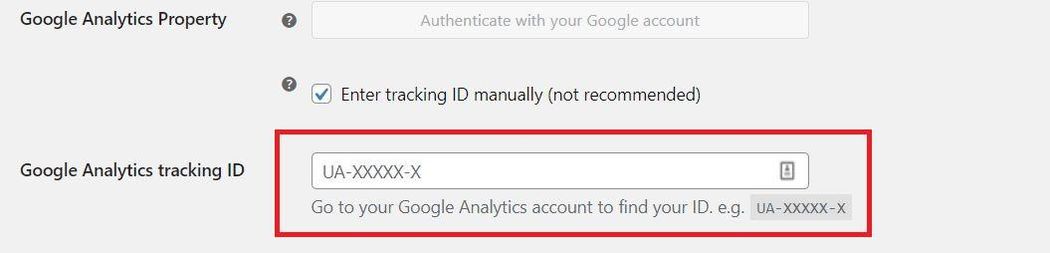
If you want instead to manually integrate your GA account, you can find your tracking code by going to Admin > Tracking Info > Tracking Code.
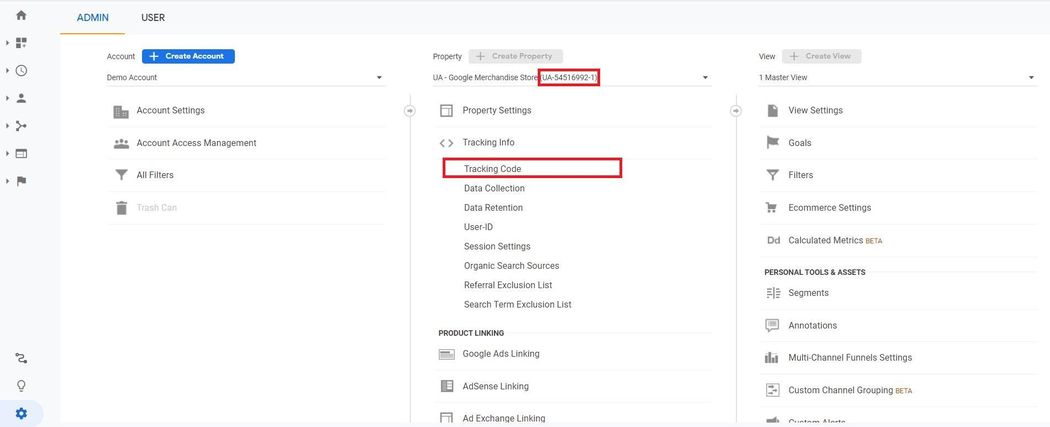
Copy the code and go back to WooCommerce. Check Enter tracking ID manually and enter the ID.
Enable ecommerce tracking in Google Analytics
Before you configure the plugin settings, you want to make sure to enable ecommerce tracking in Google Analytics. This will allow Google to collect transactional data such as products purchased and revenue from sales.
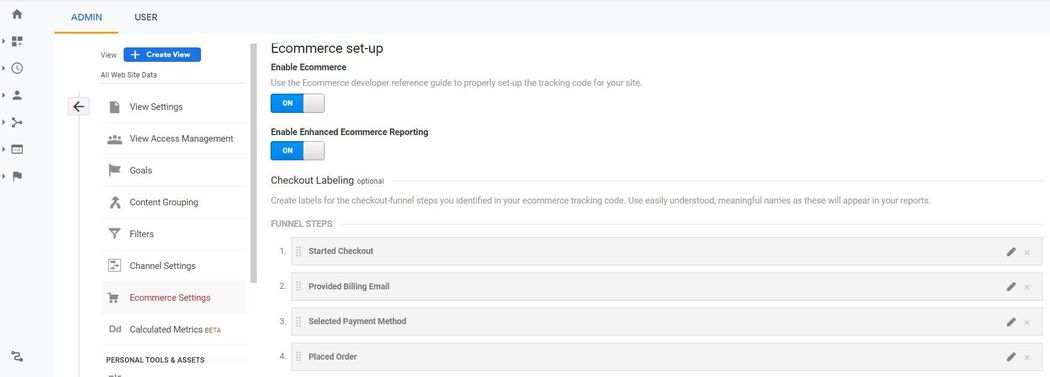
To enable Ecommerce tracking go to the Admin page and find Ecommerce Settings in the View section.
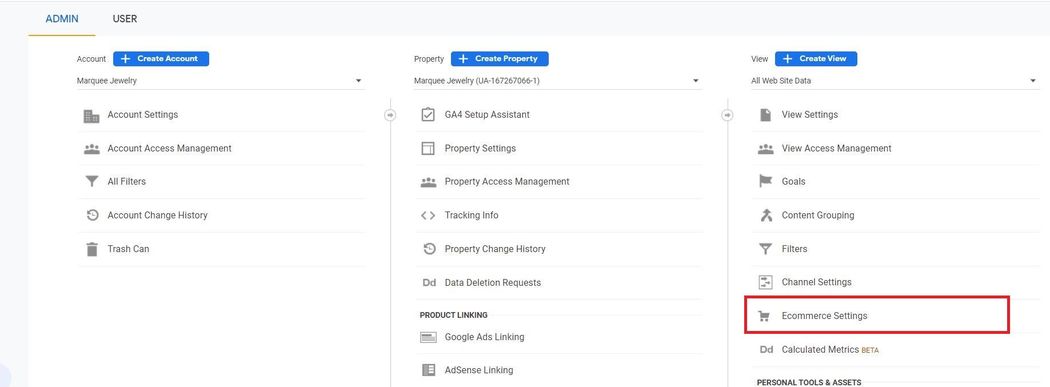
Select Enable Ecommerce.

You also want to enable Enhanced Ecommerce Reporting. With enhanced reporting, you’ll get more detailed data and insights into the behavior of your website visitors. You can also track the performance of discount codes to better understand the impacts of your marketing efforts.
Configure settings in the WooCommerce backend
After you enable ecommerce tracking, you can begin configuring the settings for the Google Analytics Pro extension.
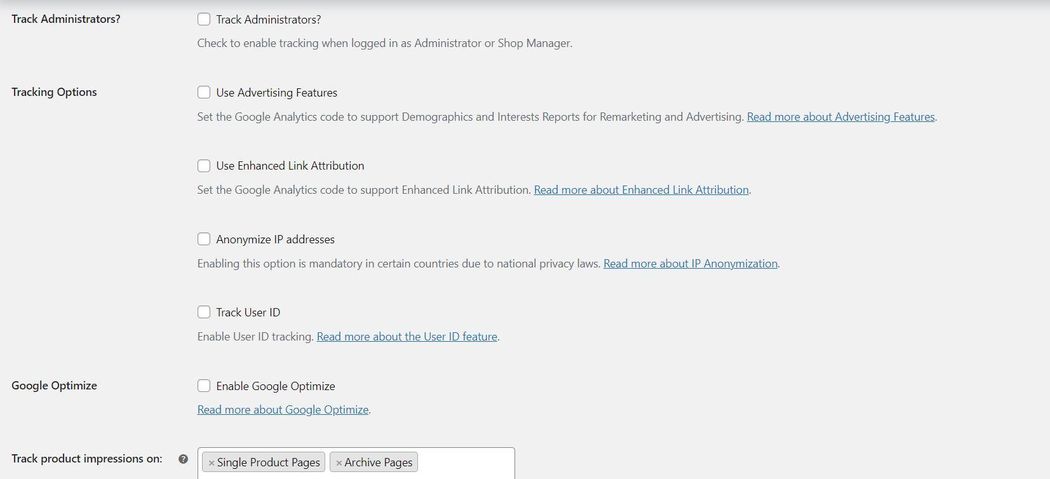
Depending on your local data protection laws, it is probably best to anonymize IP addresses. You’ll also want to enable User ID tracking as it helps ensure your user metrics are accurate. For user tracking to work, you must set up the User-ID feature in Google Analytics. You also need to create a User-ID if you want to see the data in your reports.
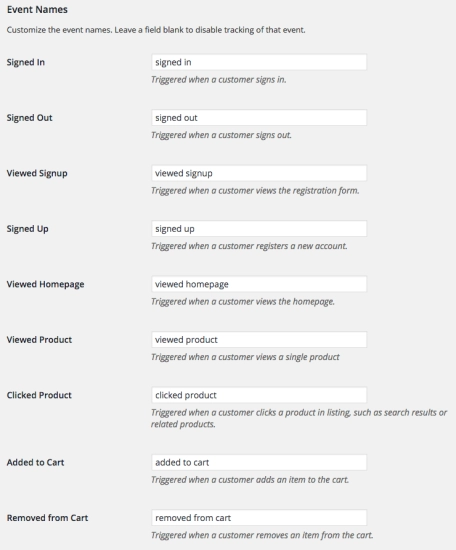
Further down the settings page, you can find a list of all the events the extension pushes to Google Analytics. You can not modify the event trigger but you can customize the event names however you like. If you don’t want to track an event, leave the field blank and the plugin will ignore it.
Finally, you’ll want to configure your checkout funnel to accurately track user behavior. The Google Analytics Pro extension automatically populates the checkout behavior funnel with the following steps.
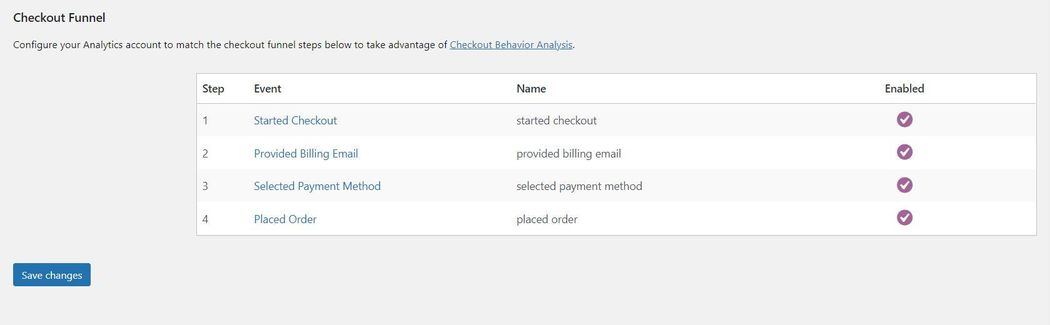
For accurate checkout tracking, you will want to create a funnel with the same steps in your Google Analytics account.
Go to Admin > Ecommerce Settings to find the options for Checkout labeling. You then need to add four funnel steps that match your WooCommerce Checkout Funnel.
That’s it. Your WooCommerce store is now set to pass all essential ecommerce data to Google Analytics. You can test your integration to ensure that everything is working by checking the Realtime activity report.
Load a new tab with Google Analytics and open your website in a private (incognito) window to not be signed in to your admin account. Go to Google Analytics > Realtime > Events. There you can see the number of current active users.
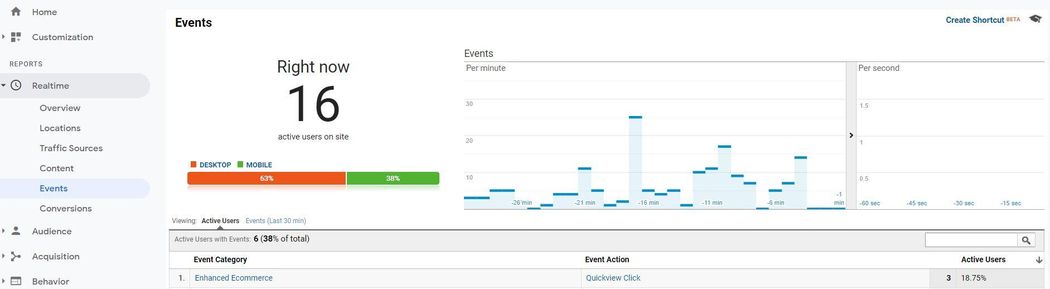
If the integration is working you should see at least one active user. Later on, we will discuss how to navigate the various Google Analytics reports to track your store’s performance.
Using Google Tag Manager to Connect Google Analytics and WooCommerce
The other way to connect Google Analytics and WooCommerce is to use Google Tag Manager (GTM), a great tool for adding all sorts of tags to your website. The process of using GTM to integrate the two is admittedly more involved than using a plugin. But, it does offer more control over your integration if you are willing to endure a longer setup.
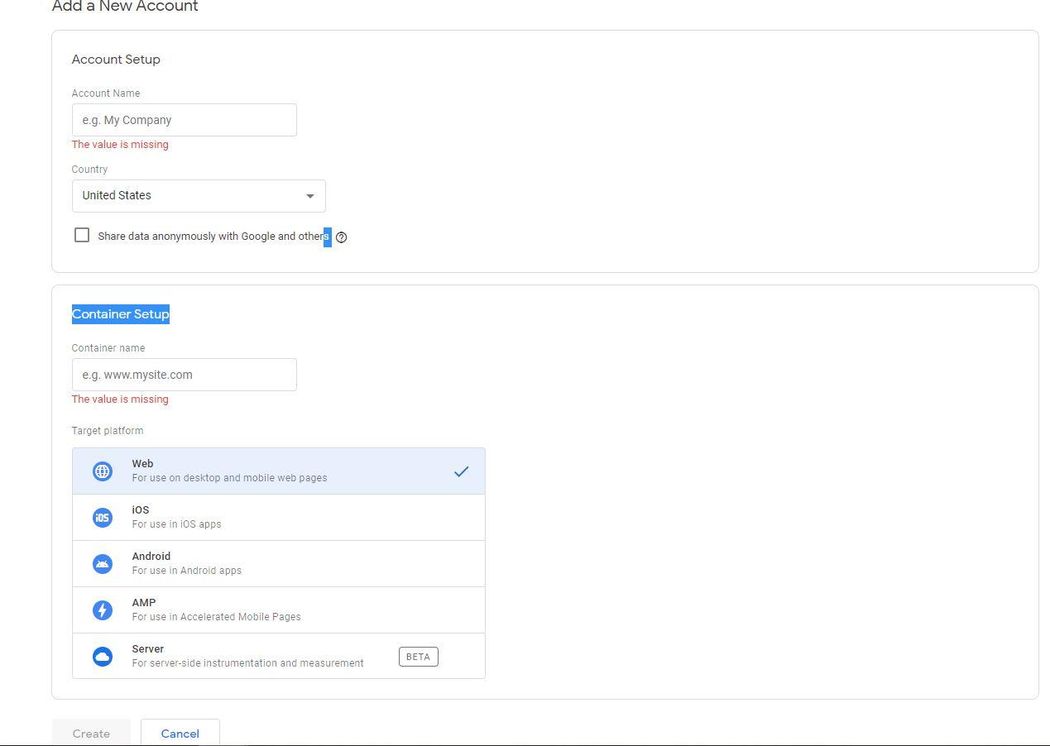
Below is a brief overview of the steps to create a GTM account if you do not already have one.
Go to https://tagmanager.google.com/ and select Create Account. Enter the name for the account as well as the container name (your store URL). Select Web for Target Platform and click Create. You’ll then need to agree to the data processing terms of service to complete the account creation process.
Once your account is set up, you will want to download a WordPress plugin to help add your tags to your site. The Google Tag Manager (GTM4WP) for WordPress plugin is great a option as it lets you build detailed GTM triggers for events like add to carts and checkouts started.
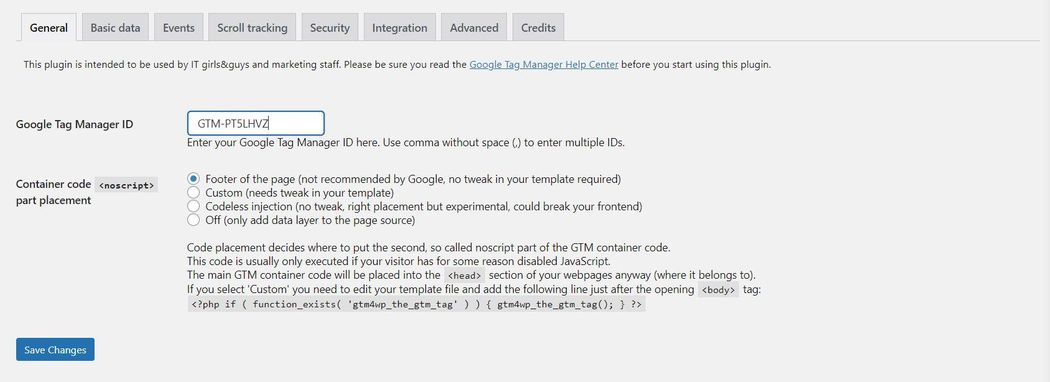
The plugin is free and available through your WordPress dashboard. After you activate the plugin, you’ll get a notification to add your GTM ID.

Click the link, paste your GTM ID into the appropriate field and save the changes.
Next, you will go to Integration > WooCommerce to enable enhanced ecommerce tracking
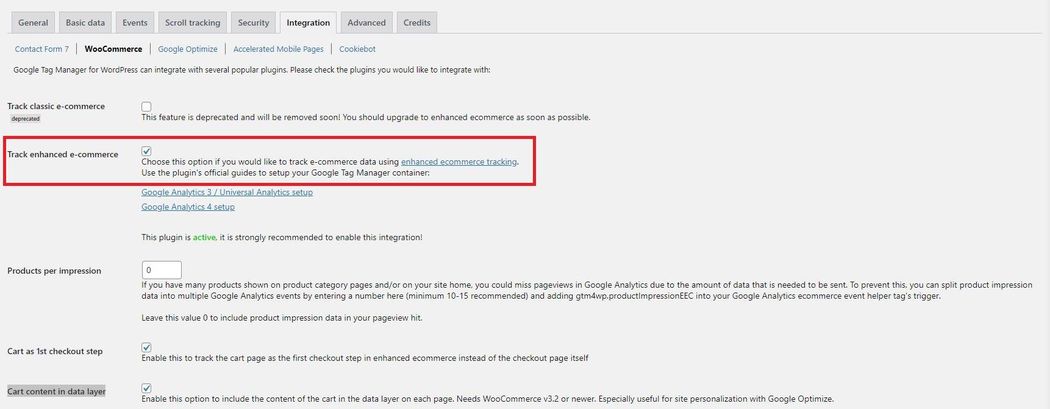
I also recommend that you enable the following settings:
- Cart as 1st checkout step
- Cart content in data layer
- Customer data in data layer
- Exclude tax from revenue
- Google Ads Remarketing
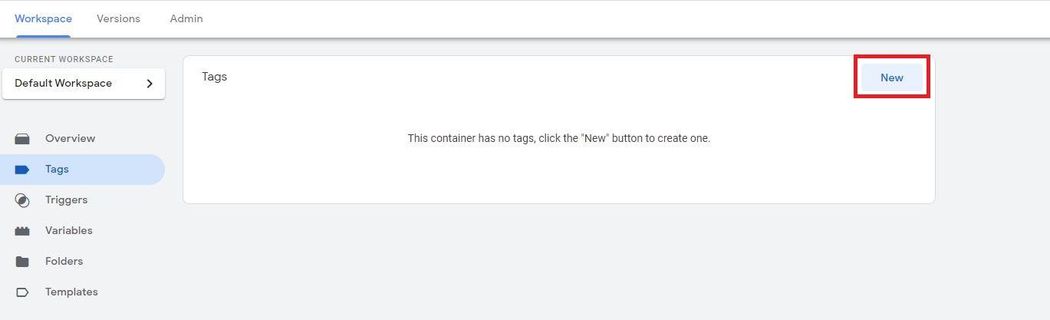
With the plugin configured, you now want to go to GTM to create a tag to use.
Go to Tags and click New.
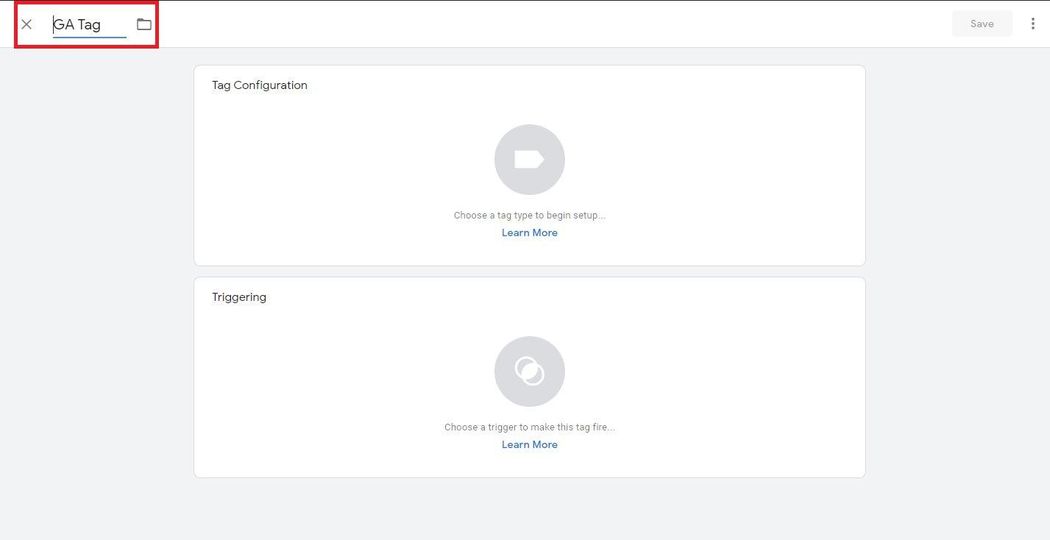
Name the tag and click the Tab Configuration box.
You’ll then have the option to choose a tag type. Select Google Analytics: Universal Analytics.
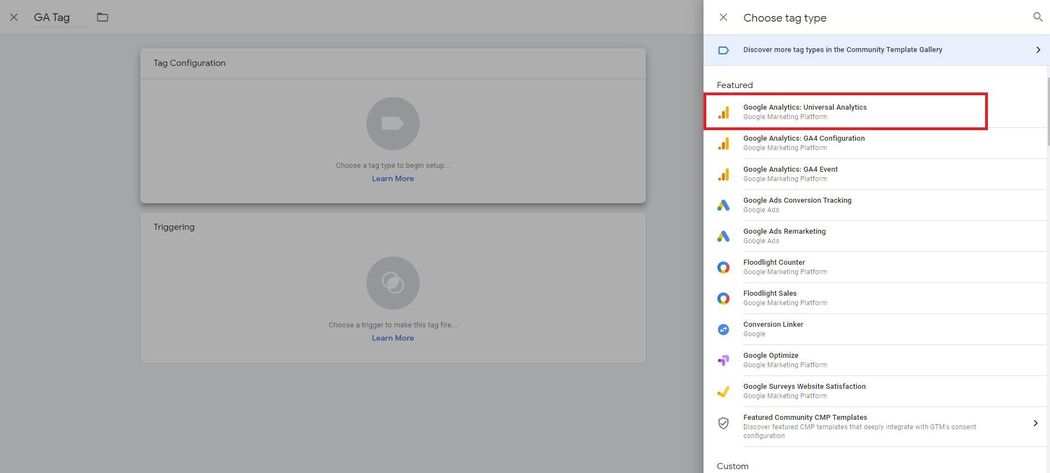
Next, you want to select the track type. For our example, we will use Page view. You can also track events, transactions, social interactions, and timing.
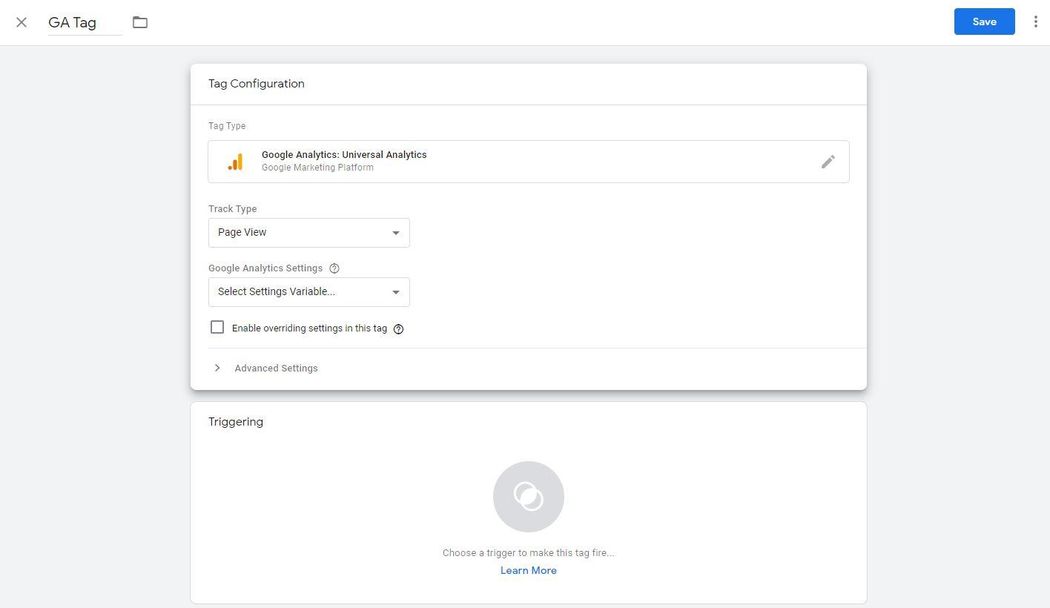
Now, you’ll need to choose a Settings variable. If you do not already have one, you create a new variable using your Google Analytics tracking ID.
After you select your variable, there are a couple of important settings to enable. First, select Enable overriding settings in this tag. Then go to More Settings and find Ecommerce. Select True for Enable Enhanced Ecommerce Features and enable Use Data Layer.
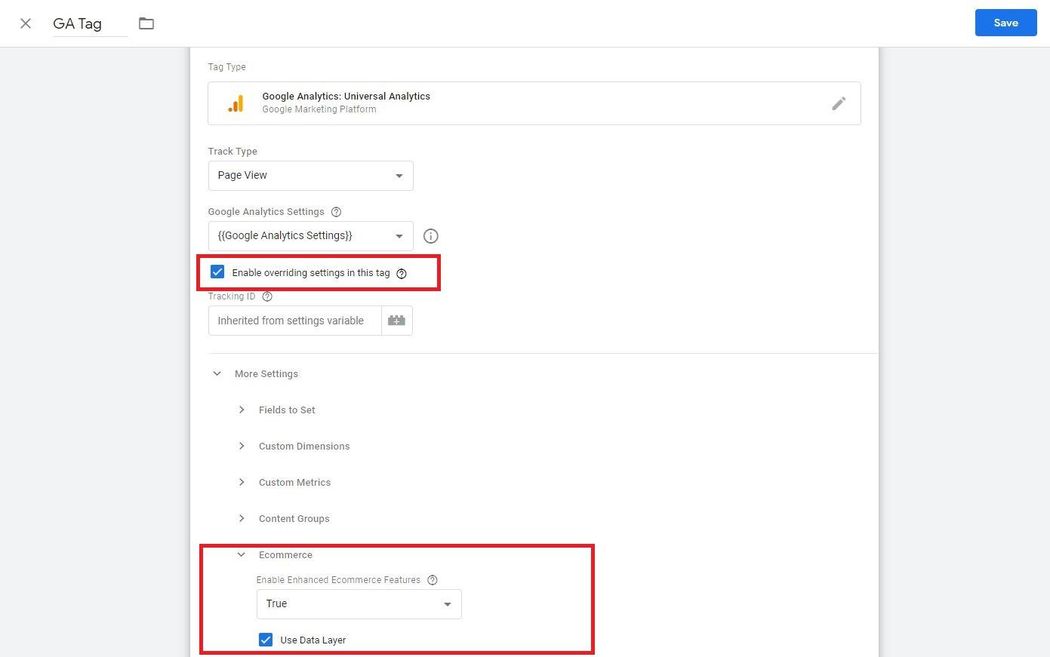
Enabling these settings ensures the tag can pull all the data from your website’s data layer.
With Tag Configuration complete, the last step is to choose a trigger to make the tag fire. Click the Triggering box. Select the trigger (in our case All page views).
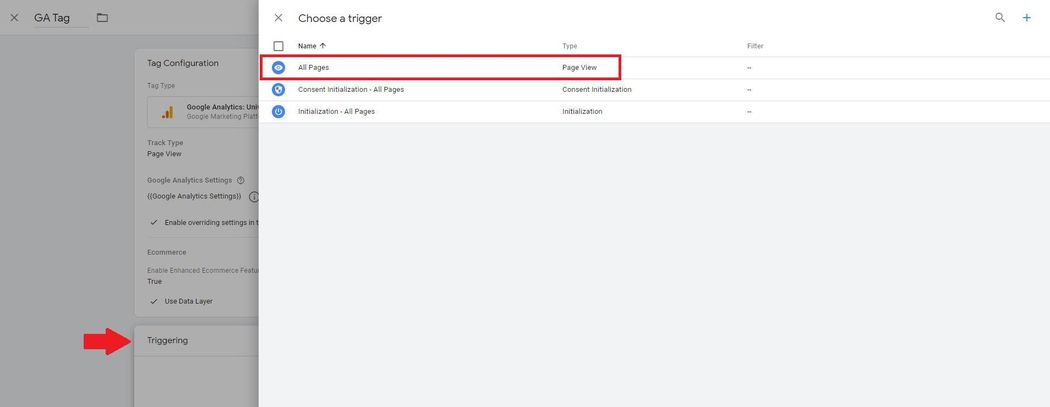
And there you go. Your tag is now properly set up to send all ecommerce events to Google Analytics. If you want to test the tag, you can do so by clicking Preview and connecting Tag Assistant to your site.
Measuring the performance of your WooCommerce site
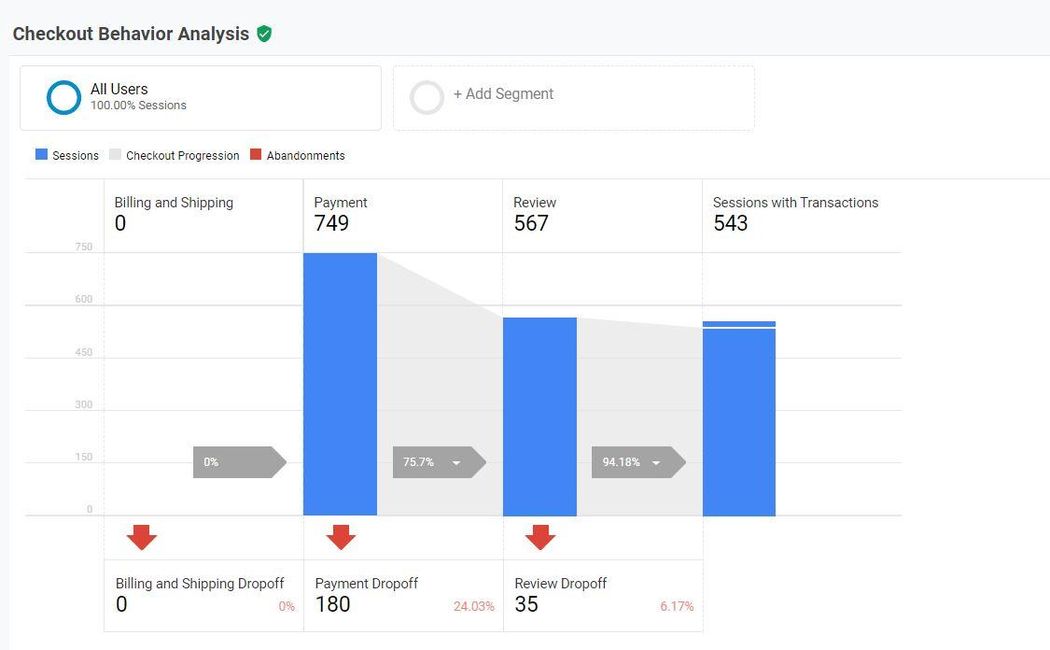
Checkout behavior analysis
The checkout behavior analysis report shows you how visitors are moving through the checkout process. You can use these insights to see which steps users complete before leaving your checkout page.
To review the report, go to Conversions > E-commerce > Checkout behavior.
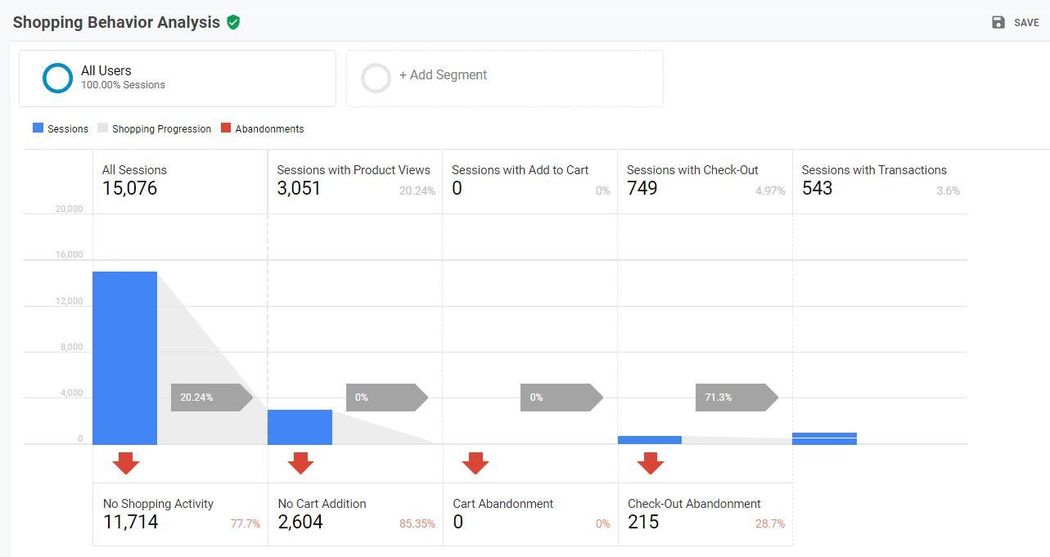
Shopping behavior report
The shopping behavior analysis report shows you how many of your users are adding items to their cart and how many are abandoning their carts. You can use these insights to see if you need to improve your customer experience.
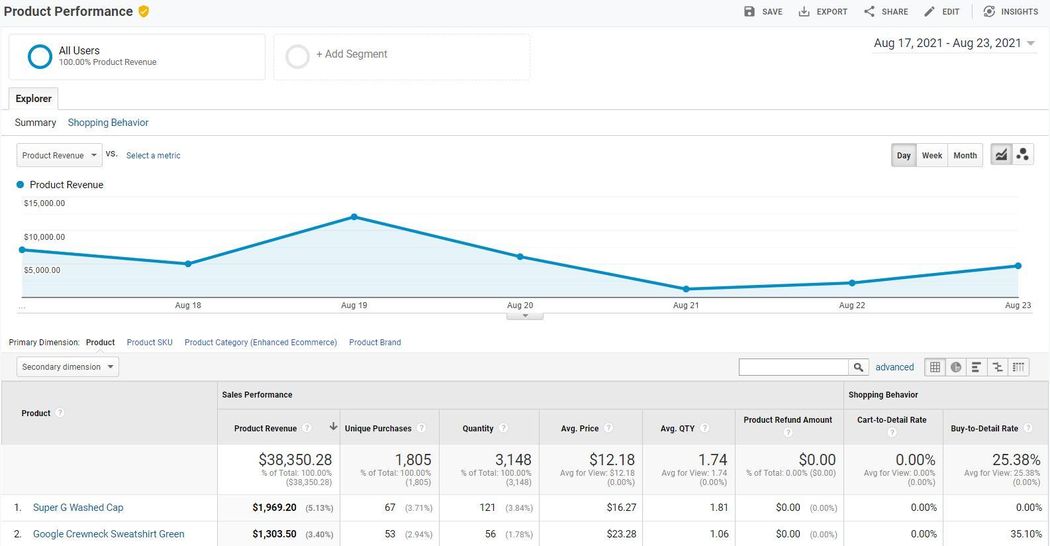
Product performance report
The product performance report provides sales performance and shopping behavior date for all your ecommerce items. You can see revenue per product, the number of purchases, and average sales price. You can also see the percentage of people that bought each product after viewing the product page.
Closing thoughts on Google Analytics & WooCommerce
The in-depth reporting available in Google Analytics is an invaluable tool when managing an ecommerce store. With the robust data, you can make better decisions for your business while uncovering new opportunities to grow and improve.
Whether you choose to use a plugin, tag manager, or manul integration, this guide outlines what you need to start collecting accurate data for your site.